Frigidaire FPBM189KF Installation Instructions (All Languages) - Page 7
Checklist For Installation - microwave oven
 |
UPC - 012505560262
View all Frigidaire FPBM189KF manuals
Add to My Manuals
Save this manual to your list of manuals |
Page 7 highlights
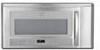
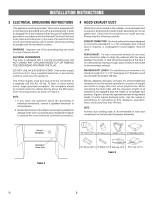
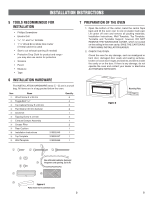
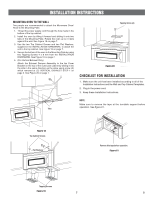
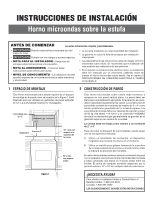
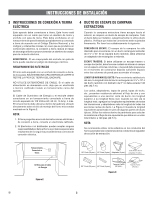
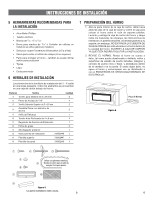
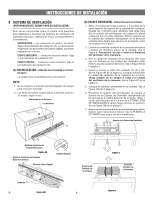
INSTALLATION INSTRUCTIONS MOUNTING OVEN TO THE WALL Two people are recommended to attach the Microwave Oven/ Hood to the Mounting Plate. 1. Thread the power supply cord through the hole made in the bottom of the top cabinet. 2. Install the oven by tilting it forward and sliding it onto two tabs of the Mounting Plate. Rotate the oven up so it rests against the wall. See Figure 18 on page 7. 3. Use the two Top Cabinet Screws and two Flat Washers, supplied in the INSTALLATION HARDWARE, to attach the unit to the top cabinet. See Figure 19 on page 7. 4. Secure the bottom of the oven to the Mounting Plate by using two Tapping Screws 4 x 8 mm from the INSTALLATION HARDWARE. See Figure 19 on page 7. 5. (For Vertical Exhaust Only) Attach the Exhaust Damper Assembly to the fan Cover Bracket on the top of the outercase cabinet by sliding it into the slits in the same direction as the allow using screw (A) which removed at (C) VERTICAL EXHAUST STEP 1 on page 5. See Figure 20 on page 7. Tapping Screw (A) Figure 20 CHECKLIST FOR INSTALLATION 1. Make sure the unit has been installed according to all of the Installation Instructions and the Wall and Top Cabinet Templates. 2. Plug in the power cord. 3. Keep these Installation Instructions. NOTE: Make sure to remove the tape at the turntable support before operation. See figure 21. Tabs Figure 18 Top Cabinet Screws Flat Washers Remove this tape before operation. Figure 21 Tapping Screws Figure 19 7 E
-
 1
1 -
 2
2 -
 3
3 -
 4
4 -
 5
5 -
 6
6 -
 7
7 -
 8
8 -
 9
9 -
 10
10 -
 11
11 -
 12
12 -
13
-
14
-
15
-
16
-
17
-
18
-
19
-
20
-
21
-
22
-
23
-
24
 |
 |