Frigidaire FPIC3677RF Complete Owner s Guide - Page 9
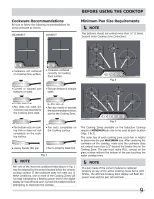
Cookware Recommendations, Minimum Pan Size Requirements - cooktop
 |
View all Frigidaire FPIC3677RF manuals
Add to My Manuals
Save this manual to your list of manuals |
Page 9 highlights
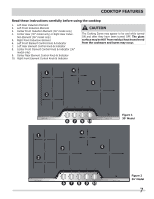
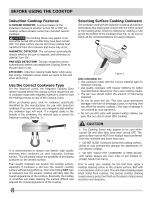
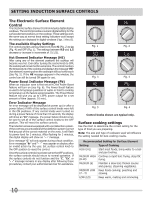
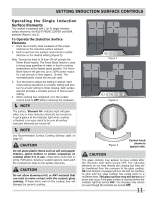
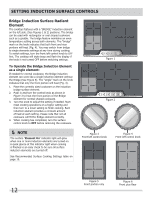
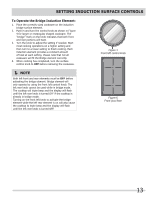
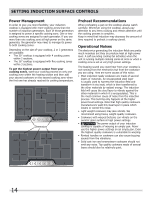
Cookware Recommendations Be sure to follow the following recommendations for using cookware as shown: INCORRECT CORRECT BEFORE USING THE COOKTOP Minimum Pan Size Requirements NOTE Pan bottoms should not extend more than ½" (13mm) beyond outer Cooking Zone (Induction). • Cookware not centered on Cooking Zone surface. • Cookware centered correctly on Cooking Zone surface. 145mm 5 3/4" Min. 145mm 5 3/4" Min. 100mm 3 7/8" Min. 230mm 9 1/16" Min. Fig. 2 • Curved or warped pan • Flat pan bottom & straight bottoms or sides. sides. • Pan does not meet the minimum size required for the Cooking Zone used. • Pan size meets or exceeds the recommended minimum size for the Cooking Zone. 145mm 5 3/4" Min. 145mm 5 3/4" Min. 180mm 7" Min. 100mm 3 7/8" Min. 230mm 9 1/16" Min. • Pan bottom rests on cooktop trim or does not rest completely on the cooktop surface. • Pan rests completely on the Cooktop surface. • Heavy handle tilts pan. • Pan is properly balanced. Fig. 1 NOTE ANY one of the incorrect conditions listed above in Fig. 1 may be detected by the sensors located below the ceramic cooktop surface. If the cookware does not meet any of these conditions, one or more of the Cooking Zones will not heat indicated by a flashing power level in the digital display for that affected zone. Correct the problems before attempting to reactivate the cooktop. Fig. 3 The Cooking Zones available on the Induction Cooktop require a MINIMUM pan size to be used at each location (Figs. 2 & 3). The outer tips of each cooking zone cross-hair is helpful to determine the pan MAXIMUM size. After centering the cookware on the cooktop, make sure the cookware does not extend more than 1/2" beyond the thicker line on the Cooking Zone. The pan must make FULL contact on the glass surface without the bottom of the pan touching the metal cooktop trims. NOTE If a pan made of the correct material is centered properly on any of the active Cooking Zones but is TOO SMALL, the affected Cooking Zone display will flash the power level and the pan will not heat. 9
-
 1
1 -
2
-
3
-
 4
4 -
 5
5 -
 6
6 -
 7
7 -
 8
8 -
 9
9 -
 10
10 -
 11
11 -
 12
12 -
 13
13 -
 14
14 -
15
-
16
-
17
-
18
-
19
 |
 |