Frigidaire GLMB209DS Installation Instructions
Frigidaire GLMB209DS - 2.0 cu. Ft. Microwave Oven Manual
 |
View all Frigidaire GLMB209DS manuals
Add to My Manuals
Save this manual to your list of manuals |
Frigidaire GLMB209DS manual content summary:
- Frigidaire GLMB209DS | Installation Instructions - Page 1
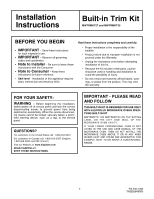
ext.8199 (French) Visit our Website at: www.frigidaire.com READ CAREFULLY. KEEP THESE INSTRUCTIONS. IMPORTANT - PLEASE READ AND FOLLOW THIS BUILT-IN KIT IS DESIGNED FOR USE ONLY WITH ELETROLUX MICROWAVE OVENS SPECIFYING BUILT-IN KIT MWTRMKT27 OR MWTRMKT30 ON THE RATING LABEL ON THE LEFT SIDE WALL - Frigidaire GLMB209DS | Installation Instructions - Page 2
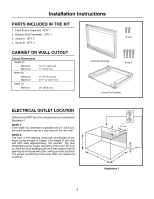
Installation Instructions PARTS INCLUDED IN THE KIT 1. Front Frame Assembly - QTY 1 2. Exhaust Duct Assembly - QTY 1 3. Screw A - suppor t the weight of the oven and floor load (approximately 100 pounds). The floor A should be level for proper operation of the oven. Be sure to check the local - Frigidaire GLMB209DS | Installation Instructions - Page 3
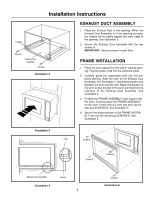
Installation Instructions Flanges Screw A Exhaust Duct Assembly Screw A Illustration 2 EXHAUST DUCT Place the oven adjacent to the wall or cabinet opening. Plug the power cord into the electrical outlet. 2. Carefully guide the assembled oven into the prepared opening. Slide the oven on the - Frigidaire GLMB209DS | Installation Instructions - Page 4
Installation Instruction Notes 4 - Frigidaire GLMB209DS | Installation Instructions - Page 5
Internet en: www.frigidaire.com LEA CUIDADOSAMENTE. GUARDE ESTAS INSTRUCCIONES. IMPORTANTE - POR FAVOR LEA Y CUMPLA ESTE KIT DE MARCO PARA EMPOTRADOS ESTÁ DISEÑADO PARA USO SÓLO CON LOS HORNOS MICROONDAS ELETROLUX QUE ESPECIFICAN EL KIT DE MARCO PARA EMPOTRADOS MWTRMKT27 Ó MWTRMKT30 EN LA ETIQUETA - Frigidaire GLMB209DS | Installation Instructions - Page 6
Instrucciones de Instalación PIEZAS INCLUIDAS EN EL KIT 1. Conjunto de Marco Delantero - CANT. 1 2. Conjunto de Ducto de Escape - CANT. 1 3. Tornillo A - CANT. 2 4. Tornillo B - CANT. 4 Tornillo A RECORTE EN GABINETE O PARED Dimensiones del Recorte Altura (A) Mínimo Má - Frigidaire GLMB209DS | Installation Instructions - Page 7
Instrucciones de Instalación Bridas Tornillo A Conjunto de Ducto de Escape Tornillo A Ilustración 2 Ilustración 3 CONJUNTO DE DUCTO DE ESCAPE 1. Coloque el Ducto de Escape en la abertura. Cuando el Conjunto de Ducto de Escape se coloca correctamente en la abertura, las bridas acoplarán hermé - Frigidaire GLMB209DS | Installation Instructions - Page 8
Instrucciones de Instalación Notas 4 - Frigidaire GLMB209DS | Installation Instructions - Page 9
site Web www.frigidaire.com LISEZ ATTENTIVEMENT ET CONSERVEZ CES INSTRUCTIONS IMPORTANT - VEUILLEZ LIRE ET APPLIQUER CE KIT D'ENCASTREMENT EST CONÇU POUR UNE UTILISATION UNIQUEMENT AVEC LES FOURS À MICRO-ONDES ELECTROLUX SPÉCIFIANT CE KIT D'ENCASTREMENT MWTRMKT27 OU MWTRMKT30 SUR L'ÉTIQUETTE SIGNAL - Frigidaire GLMB209DS | Installation Instructions - Page 10
Instructions d'installation PIÈCES INCLUSES DANS LE KIT 1. Ensemble de cadre frontal - QTÉ 1 2. Ensemble de conduit d'évacuation - QTÉ 1 Vis A de l'ouverture doit être constitué de contre- A plaqué suffisamment solide pour supporter le poids du four et de la charge du plancher (environ 45 kg). Le - Frigidaire GLMB209DS | Installation Instructions - Page 11
Instructions d'installation Brides Vis A Ensemble de conduit d'évacuation Vis A Illustration 2 Illustration 3 ENSEMBLE DE CONDUIT D'ÉVACUATION 1. Placez le conduit d'évacuation dans l'ouverture. Quand l'ensemble y est correctement positionné - Frigidaire GLMB209DS | Installation Instructions - Page 12
Instructions d'installation Remarques 4
-
 1
1 -
 2
2 -
 3
3 -
 4
4 -
 5
5 -
 6
6 -
 7
7 -
8
-
9
-
10
-
11
-
12
 |
 |

IMPORTANT - PLEASE READ
AND FOLLOW
THIS BUILT-IN KIT IS DESIGNED FOR USE ONLY
WITH ELETROLUX MICROWAVE OVENS SPECI-
FYING BUILT-IN KIT
MWTRMKT27 OR MWTRMKT30 ON THE RATING
LABEL ON THE LEFT SIDE WALL OF THE
MICROWAVE OVEN CAVITY.
IF YOUR LOWER CONVENTIONAL OVEN IS NOT
LISTED IN THE USE AND CARE MANUAL OF THE
MICROWAVE OVEN, THEN DO NOT INSTALL THE
MICROWAVE OVEN ABOVE IT OR IN ANY AREA
WHERE HEAT AND STEAM ARE GENERATED; FOR
EXAMPLE, NEXT TO OR ABOVE A CONVENTIONAL
RANGE.
Installation
Instructions
Built-in Trim Kit
MWTRMKT27 and MWTRMKT30
P/N 316137335
TINSEB384MRR0
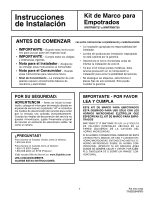
BEFORE YOU BEGIN
•
IMPORTANT
– Save these instructions
for local inspector's use.
•
IMPORTANT
– Observe all governing
codes and coordinates.
•
Note to Installer
– Be sure to leave these
instructions with the Consumer.
•
Note to Consumer
– Keep these
instructions for future reference.
•
Skill level
- Installation of this appliance requires
basic mechanical and electrical skills.
•
Proper installation is the responsibility of the
installer.
•
Product failure due to improper installation is not
covered under the Warranty.
•
Unplug the microwave oven before attempting
installation of this kit.
•
Because the kit includes metal parts, caution
should be used in handling and installation to
avoid the possibility of injury.
•
Do not remove permanently affixed labels, warn-
ings, or plates from the product. This may void
the warranty.
Read
these instructions completely and carefully.
QUESTIONS?
For customers in the United States call: 1-800-944-9044
For customers in Canada call: 1-800-213-9397 (English)
1-800-668-4606 ext.8199 (French)
Visit our Website at:
www.frigidaire.com
READ CAREFULLY.
KEEP THESE INSTRUCTIONS.
FOR YOUR SAFETY:
WARNING
– Before beginning the installation,
switch power off at service panel and lock the service
disconnecting means to prevent power from being
switched on accidentally. When the service disconnect-
ing means cannot be locked, securely fasten a promi-
nent warning device, such as a tag, to the service
panel.
1