Frigidaire GLTF2940FS Operating Instructions - Page 1
Frigidaire GLTF2940FS - 3.5 cu. Ft. Front Load Washer Manual
 |
UPC - 012505376733
View all Frigidaire GLTF2940FS manuals
Add to My Manuals
Save this manual to your list of manuals |
Page 1 highlights
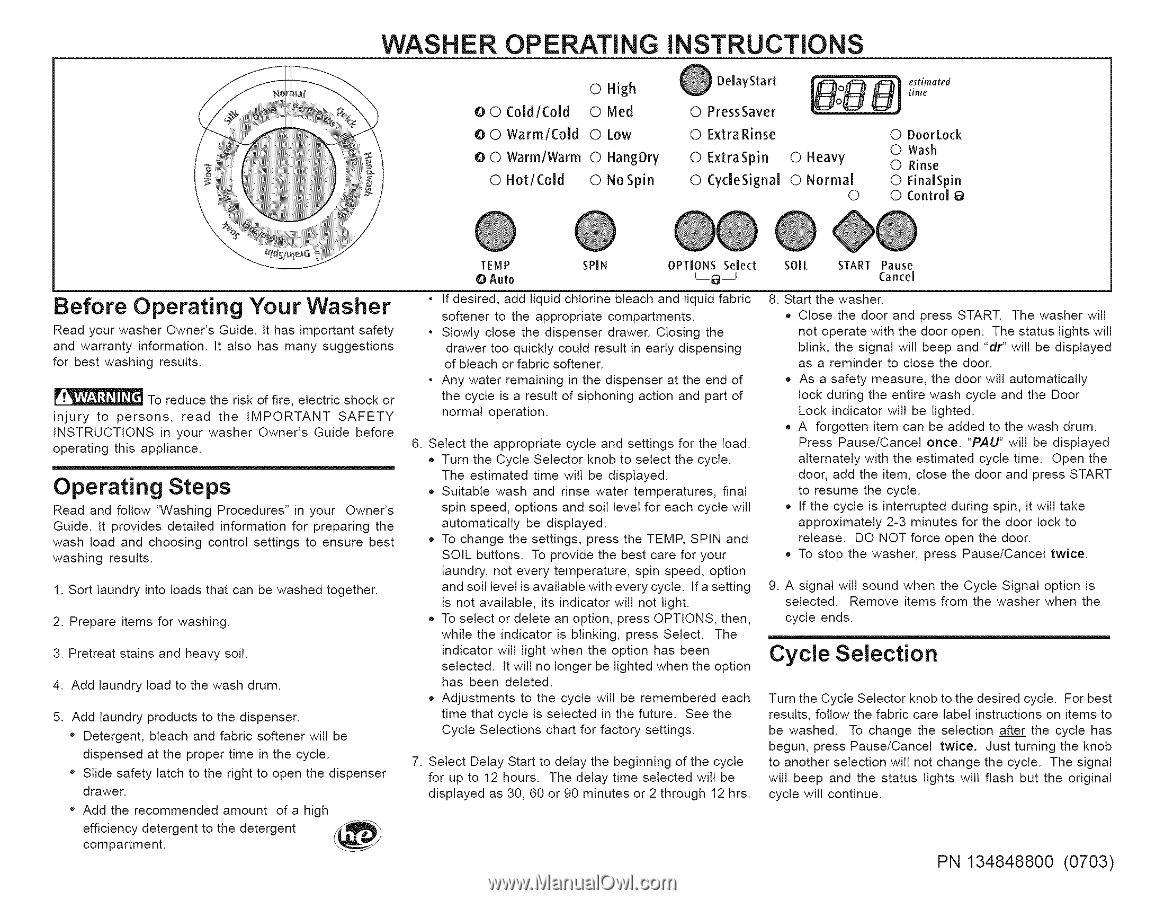
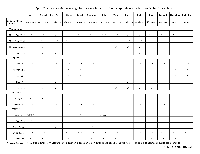
WASHER OPERATING iNSTRUCTiONS O0 Cold/Cold O0 WarmlCold © High © Med © Low 0 © Warm/Warm © HangDry © HottCold 0 No Spin DelayStart 0 0 PressSaver 0 Extra Rinse 0 ExtraSpin 0 Heavy 0 CydeSignal 0 Normal 0 time © DoorLoek 0 Wash © Rinse © FinalSpin O Control_ / Before Operating Your Washer Read your washer Owner's Guide. It has important safety and warranty information. It also has many suggestions for best washing results. To reduce the risk of fire, electric shock or injury to persons, read the IMPORTANT SAFETY INSTRUCTIONS in your washer Owner's Guide before operating this appliance. Operating Steps Read and follow 'Washing Procedures" in your Owner's Guide. It provides detailed information for preparing the wash load and choosing control settings to ensure best washing results. 1. Sort laundry into loads that can be washed together. 2. Prepare items for washing. 3. Pretreat stains and heavy soil. 4. Add laundry load to the wash drum. 5. Add laundry products to the dispenser. * Detergent, bleach and fabric softener will be dispensed at the proper time in the cycle. * Slide safety latch to the right to open the dispenser drawer. * Add the recommended amount of a high TEMP O Auto SPIN OPTIONS Select _8 J SOIL START Pause Cancel • If desired, add liquid chlorine bleach and liquid fabric softener to the appropriate compartments. • Slowly close the dispenser drawer. Closing the drawer too quickly could result in early dispensing of bleach or fabric softener. • Any water remaining in the dispenser at the end of the cycle is a result of siphoning action and part of normal operation. 6. Select the appropriate cycle and settings for the load. • Turn the Cycle Selector knob to select the cycle. The estimated time wilt be displayed. • Suitable wash and rinse water temperatures, final spin speed, options and soil level for each cycle will automatically be displayed. • To change the settings, press the TEMP, SPIN and SOIL buttons. To provide the best care for your laundry, not every temperature, spin speed, option and soil level is available with every cycle. If a setting is not available, its indicator will not light. • To select or delete an option, press OPTIONS, then, while the indicator is blinking, press Select. The indicator will light when the option has been selected. It will no longer be lighted when the option has been deleted. 8. Start the washer. • Close the door and press START. The washer will not operate with the door open. The status lights will blink, the signal wilt beep and "dr" will be displayed as a reminder to close the door. • As a safety measure, the door will automatically lock during the entire wash cycle and the Door Lock indicator wilt be lighted. • A forgotten item can be added to the wash drum. Press Pause/Cancel once. "PAU" will be displayed alternately with the estimated cycle time. Open the door, add the item, close the door and press START to resume the cycle. • If the cycle is interrupted during spin, it will take approximately 2-3 minutes for the door lock to release. DO NOT force open the door. • To stop the washer, press Pause/Cancel twice. 9. A signal will sound when the Cycle Signal option is selected. Remove items from the washer when the cycle ends. Cycle Selection • Adjustments to the cycle will be remembered each time that cycle is selected in the future. See the Cycle Selections chart for factory settings. 7. Select Delay Start to delay the beginning of the cycle for up to 12 hours. The delay time selected will be displayed as 30, 60 or 90 minutes or 2 through 12 hrs. Turn the Cycle Selector knob to the desired cycle. For best results, follow the fabric care label instructions on items to be washed. To change the selection after the cycle has begun, press Pause/Cancel twice. Just turning the knob to another selection will not change the cycle. The signal will beep and the status lights will flash but the original cycle will continue. ecoffmicipeanrctmy ednet.tergent to the detergent _._z_/ PN 134848800 (0703)
-
 1
1 -
 2
2 -
 3
3 -
 4
4 -
 5
5 -
 6
6
 |
 |