Frigidaire IM115 User Manual - Page 4
ice maker is same at top and bottom. Tighten screw
 |
UPC - 012505733819
View all Frigidaire IM115 manuals
Add to My Manuals
Save this manual to your list of manuals |
Page 4 highlights
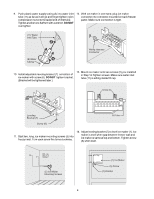
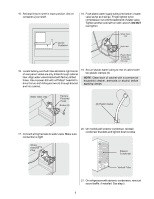
9. Push plastic water supply tubing (3) into water inlet tube (11) as far as it will go and finger tighten nylon compression nut onto threaded end of inlet tube. Tighten another one half turn with a wrench. DO NOT over tighten. 12. With ice maker in one hand, plug ice maker connector into connector mounted on back freezer panel. Make sure connection is tight. 10. Install adjustable leveling bracket (7) on bottom of ice maker with screw (6). DO NOT tighten bracket. (Bracket will be tightened later.) 13. Mount ice maker onto two screws (5) you installed in Step 12.Tighten screws. Make sure water inlet tube (11) is sitting inside fill cup. 11. Start two, long, ice maker mounting screws (5) into freezer wall. Turn each screw five turns clockwise. 14. Adjust leveling bracket (7) to level ice maker (1). Ice maker is level when gap between freezer wall and ice maker is same at top and bottom. Tighten screw (6) when level. 4
-
 1
1 -
 2
2 -
 3
3 -
 4
4 -
 5
5 -
 6
6 -
 7
7
 |
 |
