Frigidaire PLCF489GC Installation Instructions - Page 8
Range Installation, Preparation, Leveling the Range, Check Operation, Excessive Weight Hazard
 |
UPC - 057112083445
View all Frigidaire PLCF489GC manuals
Add to My Manuals
Save this manual to your list of manuals |
Page 8 highlights
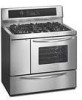
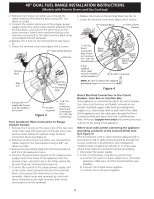
40" DUAL FUEL RANGE INSTALLATION INSTRUCTIONS (Models with Electric Ovens and Gas Cooktop) Range Installation When unpacking the range, do not discard the 4 shipping bolts. These are to be replaced on the unit for use as leveling legs and height adjustments. NOTE: 1. The back of the range may be installed directly against the wall. 2. To reduce possible scorching of vertical walls and to minimize potential fire hazards under abnormal surface unit use conditions such as high heat or no pans and to conform to A.G.A. requirements, a minimum of 2 1/2" (6.4 cm) spacing should be provided on both sides of the cooktop. 3. Slide range into cut-out opening and double check for levelness. If the range is not level, pull unit out and readjust leveling legs, or make sure floor is level. Preparation Excessive Weight Hazard • Use 2 or more people to move and install range. • Failure to follow this instruction can result in back or other injury. 1. Put on safety glasses and gloves. Remove oven racks and parts package from inside the oven. Remove shipping materials, tape and protective film from the range. 2. Take 4 cardboard corners from the carton. Stack one on top of another. Repeat with other 2 corners. Place corners lengthwise on the floor in back of the range to support range. 3. Firmly grasp the range and gently lay it on its back on the cardboard corners. 4. Remove and save the 4 shipping bolts from the skid. Discard skid. 5. Install 4 shipping bolts as leveling legs. 6. Lay a large piece of cardboard in front of the range. Carefully stand the range upright on cardboard. 7. Adjust the leveling legs to a point where the range base does not touch the floor. Leveling the Range Level the range and set cooktop height before installation in the cut-out opening (if applicable). 1. Install an oven rack in the center of the oven. 2. Place a level on the rack (see fig. 10). Take 2 readings with the level placed diagonally in one direction and then the other. Level the range, if necessary, by adjusting the 4 leveling legs with a wrench (see Figure 14). Figure 10 Check Operation Refer to the Use and Care Guide and the Electronic Oven Control Guide packaged with the range for operating instructions and for care and cleaning of your range. Remove all packaging from the oven before testing. 1. Install Burner Bases and Burner Caps This range is equipped with sealed burners as shown (see Figure 11). Burner Cap Burner Base Gas Opening Electrode Figure 11 a. Unpack burner bases and burner caps. b. Place burner bases over each gas opening. c. Make sure the burner is properly aligned and leveled. Place burner caps over appropriate burner bases. NOTE: There are no burner adjustments necessary on this range. 8
-
 1
1 -
2
-
 3
3 -
 4
4 -
 5
5 -
 6
6 -
 7
7 -
 8
8 -
 9
9 -
 10
10 -
 11
11 -
 12
12 -
 13
13 -
14
-
15
-
16
-
17
-
18
-
19
-
20
-
21
-
22
-
23
-
24
 |
 |
