Garmin Alpha 10 Owners Manual - Page 17
Selecting and Installing the Contact Points, Removing the Contact Points, Training Methods
 |
View all Garmin Alpha 10 manuals
Add to My Manuals
Save this manual to your list of manuals |
Page 17 highlights
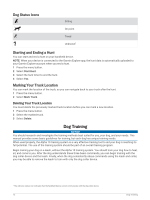
Selecting and Installing the Contact Points CAUTION To prevent irritation from the contact points, remove the collar for at least eight hours out of every 24-hour period. Do not spray the device or collar with harsh chemicals including but not limited to flea or tick spray. Always ensure that any flea or tick spray that is applied to the dog is completely dry before placing the collar on the dog. Small amounts of harsh chemicals can damage the plastic components and collar laminate. For best results, select the correct contact points based on your dog's coat. 1 Select the correct contact point length for your dog's coat type: • For dogs with thicker coats, use the longer contact points. • For dogs with shorter coats, use the shorter contact points. 2 If necessary, use the included wrench to remove the contact points. 3 Twist the contact points into the collar. 4 Tighten with the included wrench, but do not overtighten. When you put the collar on the dog, make sure the contact points are tight against the neck. Removing the Contact Points When you are not training the dog using the training keys, remove the contact points. 1 Use the included wrench to remove both contact points. 2 Place the cap over the contact point holes. Training Methods Momentary stimulation: Applies a brief stimulation when you press the training button, regardless of how long the button is depressed. Continuous stimulation: Applies stimulation to the dog the entire time you press the training button, for a maximum of 8 seconds. Your stimulations should typically be much shorter than 8 seconds. Tone: Activates an audible tone the entire time you press the training button. Vibration: Applies vibration to the dog the entire time you press the training button, for a maximum of 8 seconds. The effectiveness of vibration may vary based on the dog's temperament and experience. Choosing the Correct Intensity Level 1 Set the intensity to the lowest level (Customizing the Training Button, page 14). 2 Press the training button. 3 Observe the dog for a reaction, such as a head shake, neck movement, or just a change in expression. Sometimes dogs will vocalize due to the surprise of the electrical stimulation. If the dog vocalizes more than once, the intensity level is too high for beginning training. 4 If there is no reaction, increase the intensity level by one level until the dog has a slight but recognizable reaction to the stimulation. The intensity level that causes a slight but recognizable reaction is your dog's baseline level for beginning collar training. You do not need to, and should not, apply this intensity selection test again. After you begin training, the dog's performance guides your intensity selection. As the dog advances in training, you may need to change the level depending upon the training situation. Adjusting the Stimulation Level of an Active Training Command 1 Select a dog. 2 Press the training button. 3 Use the Thumb Stick to scroll right or left to adjust the stimulation level. Dog Training 13
-
 1
1 -
2
-
3
-
4
-
5
-
6
-
7
-
8
-
9
-
10
-
11
-
 12
12 -
 13
13 -
 14
14 -
 15
15 -
 16
16 -
 17
17 -
 18
18 -
 19
19 -
 20
20 -
 21
21 -
 22
22 -
23
-
24
-
25
-
26
 |
 |
