Garmin BC 50 with Night Vision Installation Instructions PDF - Page 4
Testing the Camera and Transmitter Location, Mounting the Camera on a License Plate
 |
View all Garmin BC 50 with Night Vision manuals
Add to My Manuals
Save this manual to your list of manuals |
Page 4 highlights
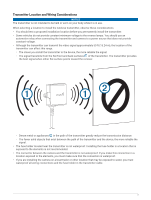
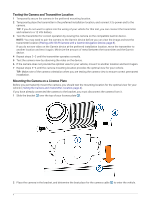
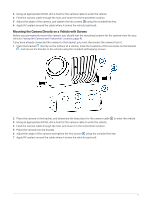
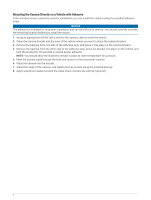
Testing the Camera and Transmitter Location 1 Temporarily secure the camera in the preferred mounting location. 2 Temporarily place the transmitter in the preferred installation location, and connect it to power and to the camera. TIP: If you do not want to splice into the wiring of your vehicle for this test, you can connect the transmitter and camera to a 12 Vdc battery. 3 Test the transmitter for correct operation by viewing the camera on the compatible Garmin device. NOTE: You may need to pair the camera to the Garmin device before you can view the image and test the transmitter location (Pairing a BC 50 IR Camera with a Garmin Navigation Device, page 8). If you do not see video on the Garmin device at the preferred installation location, move the transmitter to another location and test it again. Minimize the amount of metal between the transmitter and the Garmin device. 4 Repeat steps 2-3 until the transmitter operates correctly. 5 Test the camera view by observing the video on the device. 6 If the camera does not provide the optimal view for your vehicle, move it to another location and test it again. 7 Repeat steps 5-6 until the camera mounting location provides the optimal view for your vehicle. TIP: Make note of the camera orientation when you are testing the camera view to ensure correct permanent installation. Mounting the Camera on a License Plate Before you permanently mount the camera, you should test the mounting location for the optimal view for your vehicle (Testing the Camera and Transmitter Location, page 4). If you have already connected the camera to the bracket, you must disconnect the camera from it. 1 Slide the bracket over the top of your license plate . 2 Place the camera in the bracket, and determine the best place for the camera cable to enter the vehicle. 4
-
 1
1 -
 2
2 -
 3
3 -
 4
4 -
 5
5 -
 6
6 -
 7
7 -
 8
8
 |
 |
