Garmin BC 50 with Night Vision Owners Manual - Page 6
Guidance Lines, Aligning the Guidance Lines, Adjust Video
 |
View all Garmin BC 50 with Night Vision manuals
Add to My Manuals
Save this manual to your list of manuals |
Page 6 highlights
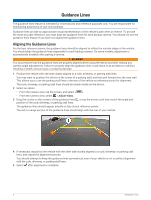
Guidance Lines NOTICE The guidance lines feature is intended for informational and reference purposes only. You are responsible for maintaining awareness of your surroundings. Guidance lines provide an approximate visual representation of the vehicle's path when in reverse. To provide the most accurate reference, you must align the guidance lines for each backup camera. You should not use the guidance lines feature if you have not aligned the guidance lines. Aligning the Guidance Lines For the best reference points, the guidance lines should be aligned to reflect the outside edges of the vehicle. You should align the guidance lines separately for each backup camera. On some models, adjustment is automatically available after pairing a camera. WARNING You must ensure that the guidance lines are properly aligned before using the device and after making any camera angle adjustments. Failure to properly align the guidance lines could result in an accident or collision, resulting in death, serious injury, or property damage. 1 Position the vehicle with one side closely aligned to a curb, driveway, or parking stall lines. You may want to position the vehicle in the center of a parking stall, and then pull forward into the next stall. This allows you to use the parking stall lines in the rear of the vehicle as reference points for alignment. The curb, driveway, or parking stall lines should be clearly visible on the device. 2 Select an option: • From the camera view, tap the screen, and select . • From the camera view, select > Adjust Video. 3 Drag the circles on the corners of the guidance lines , or tap the arrows until they match the angle and position of the curb, driveway, or parking stall lines. The guidance lines should appear directly on top of your reference points. The red or orange section of the guidance lines should align with the rear of your vehicle. 4 If necessary, reposition the vehicle with the other side closely aligned to a curb, driveway, or parking stall lines, and repeat the alignment process. You should attempt to keep the guidance lines symmetrical, even if your vehicle is not in perfect alignment with the curb, driveway, or parking stall lines. 5 Select after alignment is complete. 2 Guidance Lines
-
 1
1 -
 2
2 -
 3
3 -
 4
4 -
 5
5 -
 6
6 -
 7
7 -
 8
8 -
 9
9 -
 10
10
 |
 |
