Garmin Colorado 300 Owner's Manual - Page 41
Connecting Your Colorado to a Computer, Transferring Tracks, Routes, or - update
 |
UPC - 753759067069
View all Garmin Colorado 300 manuals
Add to My Manuals
Save this manual to your list of manuals |
Page 41 highlights
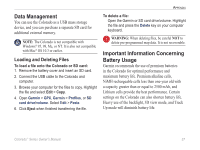
Connecting Your Colorado to a Computer You can connect the Colorado to your computer using the supplied USB cable. Note: Install the supplied MapSource® Trip and Waypoint Manager software on your computer before connecting the USB cable. Follow the instructions provided with the software. To connect your Colorado to your computer: 1. Lift the weather cap on the top of the Colorado and insert the smaller connector on the USB cable into the USB mini-B jack. 2. Connect the remaining cable end to an empty USB port on your computer. Information About USB Drivers The USB drivers are automatically installed when you install the MapSource Trip and Waypoint Manager software that came with your Colorado. When you initially connect the Colorado to a USB port, your computer might prompt you to locate the destination of the drivers for the device. You only need to install Appendix the drivers once. After the drivers are installed, your computer always detects your Colorado when it is connected. USB drivers might be updated periodically. You can find updates at www.garmin.com. Transferring Tracks, Routes, or Waypoints from the Colorado to Your Computer Tracks, routes, and waypoints saved on your Colorado can be saved and viewed in the Trip and Waypoint Manager software. To transfer tracks, routes, or waypoints: 1. Ensure that Trip and Waypoint Manager is installed on your computer and open. 2. Ensure that the Colorado is connected to the computer with the USB cable and powered on. 3. Click the icon at the top of the screen. Colorado™ Series Owner's Manual 35
-
 1
1 -
2
-
3
-
4
-
5
-
6
-
7
-
8
-
9
-
10
-
11
-
12
-
13
-
14
-
15
-
16
-
17
-
18
-
19
-
20
-
21
-
22
-
23
-
24
-
25
-
26
-
27
-
28
-
29
-
30
-
31
-
32
-
33
-
34
-
35
-
 36
36 -
 37
37 -
 38
38 -
 39
39 -
 40
40 -
 41
41 -
 42
42 -
 43
43 -
 44
44 -
 45
45 -
 46
46 -
47
-
48
 |
 |