Garmin DriveSmart 65 with Amazon Alexa Owners Manual - Page 15
Arriving at Your Destination, Changing Your Active Route
 |
View all Garmin DriveSmart 65 with Amazon Alexa manuals
Add to My Manuals
Save this manual to your list of manuals |
Page 15 highlights
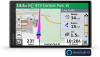
next turn or exit, or other actions appear across the top of the map. Next action in the route. Indicates the next turn, exit, or other action and the lane in which you should travel, if available. Distance to the next action. Name of the street or exit associated with the next action. Route highlighted on the map. Next action in the route. Arrows on the map indicate the location of upcoming actions. Vehicle speed. Name of the road on which you are traveling. Estimated arrival time. TIP: You can touch this field to change the information it shows (Changing the Map Data Field, page 14). Map tools. Provides tools to show you more information about your route and surroundings. Active Lane Guidance As you approach some turns, exits, or interchanges in your route, a detailed simulation of the road appears beside the map, if available. A colored line indicates the proper lane for the turn. Viewing Turns and Directions While navigating a route, you can view upcoming turns, lane changes, or other directions for your route. 1 From the map, select an option: • To view upcoming turns and directions as you navigate, select > Turns. The map tool displays the next four turns or directions beside the map. The list updates automatically as you navigate the route. • To view the complete list of turns and directions for the entire route, select the text bar at the top of the map. 2 Select a turn or direction (optional). Detailed information appears. An image of the junction may appear for junctions on major roadways, if available. Viewing the Entire Route on the Map 1 While navigating a route, select anywhere on the map. 2 Select . Arriving at Your Destination When you approach your destination, the device provides information to help you complete your route. • indicates the location of your destination on the map, and a voice prompt announces you are approaching your destination. • When you approach some destinations, the device automatically prompts you to search for parking. You can select Yes to find nearby parking areas (Parking Near Your Destination, page 11). • When you stop at your destination, the device automatically ends the route. If the device does not detect your arrival automatically, you can select Stop to end your route. Parking Near Your Destination Your device can help you find a parking spot near your destination. When you approach some destinations, the device automatically prompts you to search for parking. 1 Select an option: • When the device prompts you, select Yes to search for nearby parking. • If the device does not prompt you, select Where To? > Categories > Parking, and select > My Destination. 2 Select Filter Parking, and select one or more categories to filter parking by availability, type, price, or payment methods (optional). NOTE: Detailed parking data is not available in all areas or for all parking locations. 3 Select a parking location, and select Go! > Add As Next Stop. The device guides you to the parking area. Changing Your Active Route Adding a Location to Your Route Before you can add a location to your route, you must be navigating a route (Starting a Route, page 10). You can add locations to the middle or end of your route. For example, you can add a fuel station as the next destination in your route. TIP: To create complex routes with multiple destinations or scheduled stops, you can use the trip planner to plan, schedule, and save a trip (Planning a Trip, page 17). 1 From the map, select > Where To?. 2 Search for a location (Finding and Saving Locations, page 6). 3 Select a location. 4 Select Go!. 5 Select an option: • To add the location as the next destination in your route, select Add As Next Stop. • To add the location to the end of your route, select Add As Last Stop. • To add the location and edit the order of destinations in your route, select Add to Active Route. The device re-calculates the route to include the added location and guides you to the destinations in order. Shaping Your Route Before you can shape your route, you must start a route (Starting a Route, page 10). You can manually shape your route to change its course. This allows you to direct the route to use a certain road or go through a certain area without adding a destination to the route. 1 Touch anywhere on the map. Following a Route 11
-
 1
1 -
2
-
3
-
4
-
5
-
6
-
7
-
8
-
9
-
 10
10 -
 11
11 -
 12
12 -
 13
13 -
 14
14 -
 15
15 -
 16
16 -
 17
17 -
 18
18 -
 19
19 -
 20
20 -
21
-
22
-
23
-
24
-
25
-
26
-
27
-
28
-
29
-
30
 |
 |
