Garmin ECHOMAP UHD 62cv Owners Manual - Page 25
Stopping the Transmission of Sonar Signals, Changing the Sonar View, Traditional Sonar View, Garmin
 |
View all Garmin ECHOMAP UHD 62cv manuals
Add to My Manuals
Save this manual to your list of manuals |
Page 25 highlights
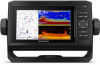
Tack and Gybe You can set the autopilot to perform a tack or gybe while heading hold or wind hold is engaged. Tacking and Gybing from Heading Hold 1 Engage heading hold (Engaging the Autopilot, page 28). 2 Select MENU. 3 Select an option. The autopilot steers your boat through a tack or gybe. Tacking and Gybing from Wind Hold Before you can engage wind hold, you must have a wind sensor installed. 1 Engage wind hold (Engaging Wind Hold, page 18). 2 Select MENU. 3 Select an option. The autopilot steers your boat through a tack or gybe, and information about the progress of the tack or gybe appears on the screen. Setting a Tack and Gybe Delay The tack and gybe delay allows you to delay steering a tack and gybe after you initiate the maneuver. 1 From the autopilot screen, select MENU > Autopilot Setup > Sailing Setup > Tack/Gybe Delay. 2 Select the length of the delay. 3 If necessary, select Done. Enabling the Gybe Inhibitor NOTE: The gybe inhibitor does not prevent you from manually performing a gybe using the helm or step steering. The gybe inhibitor prevents the autopilot from performing a gybe. 1 From the autopilot screen, select MENU > Autopilot Setup > Sailing Setup > Gybe Inhibitor. 2 Select Enabled. Sonar Fishfinder When properly connected to a compatible transducer, your chartplotter can be used as a fishfinder. For more information about which transducer is best for your needs, go to garmin.com/transducers. Different sonar views can help you view the fish in the area. The sonar views available vary depending on the type of transducer and sounder module connected to the chartplotter. For example, you can view certain Panoptix™ sonar screens only if you have a compatible Panoptix transducer connected. There are four basic styles of sonar views available: a fullscreen view, a split-screen view that combines two or more views, a split-zoom view, and a split-frequency view that displays two different frequencies. You can customize the settings for each view in the screen. For example, if you are viewing the split-frequency view, you can separately adjust the gain for each frequency. If you do not see an arrangement of sonar views to suit your needs, you can create a custom combination screen (Creating a New Combination Page with the ECHOMAP UHD 70/90, page 2). Stopping the Transmission of Sonar Signals • To disable the active sonar, from the sonar screen, select MENU > Sonar Transmit. • To disable all sonar transmissions, press , and select Disable Sonar. Changing the Sonar View 1 From a combination screen with sonar, select MENU > Configure Combination > Edit Combination. 2 Select the window to change. 3 Select a sonar view. Traditional Sonar View There are several full-screen views available, depending on the transducer that is connected. The full-screen Traditional sonar view shows a large image of the sonar readings from a transducer. The range scale along the right side of the screen shows the depth of detected objects as the screen scrolls from the right to the left. Depth information Suspended targets or fish Bottom of the body of water Split-Frequency Sonar View In the split-frequency sonar view, the two sides of the screen show a full-view graph of sonar data of different frequencies. NOTE: The split-frequency sonar view requires the use of a dual-frequency transducer. Split-Zoom Sonar View The split-zoom sonar view shows a full-view graph of sonar readings, and a magnified portion of that graph, on the same screen. Garmin ClearVü Sonar View NOTE: To receive Garmin ClearVü scanning sonar, you need a compatible chartplotter or fishfinder and a compatible transducer. For information about compatible transducers, go to garmin.com/transducers. Garmin ClearVü high-frequency sonar provides a detailed picture of the fishing environment around the boat in a detailed representation of structures the boat is passing over. Traditional transducers emit a conical beam. The Garmin ClearVü scanning sonar technology emits two narrow beams, similar to the shape of the beam in a copying machine. These beams provide a clearer, picture-like image of what is beneath the boat. Sonar Fishfinder 19
-
 1
1 -
2
-
3
-
4
-
5
-
6
-
7
-
8
-
9
-
10
-
11
-
12
-
13
-
14
-
15
-
16
-
17
-
18
-
19
-
 20
20 -
 21
21 -
 22
22 -
 23
23 -
 24
24 -
 25
25 -
 26
26 -
 27
27 -
 28
28 -
 29
29 -
 30
30 -
31
-
32
-
33
-
34
-
35
-
36
-
37
-
38
-
39
-
40
-
41
-
42
-
43
-
44
-
45
-
46
-
47
-
48
-
49
-
50
-
51
-
52
 |
 |
