Garmin GPS 72H Quick Start Manaul - Page 10
Recording your Tracks, Creating and Navigating, Routes
 |
View all Garmin GPS 72H manuals
Add to My Manuals
Save this manual to your list of manuals |
Page 10 highlights
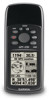
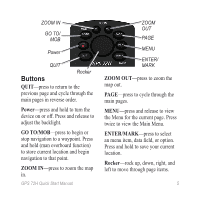
Recording your Tracks The track log starts recording as soon as the device gets a location fix. To save the entire track log: 1. Press MENU twice > select Tracks. 2 Select Save > Entire Log. To save a portion of the track log: 1. Press MENU twice > select Tracks. 2. Select Save. 3. Select the portion of the track log to save from the list 4. Select OK. To view a track on the map: 1. Press MENU twice > select Tracks. 2. Select a track to view. 3. Select Map. Creating and Navigating Routes A route is a sequence of waypoints that lead you to your destination. A route must have at least two waypoints. 1. Press MENU twice > select Routes > New. 2. Press MENU to add a waypoint using the Map page or from existing waypoints. 3. Select OK to a��d�d���it��t�o��t�h�e��r�o��u�t�e��. 4. Repeat steps 2 through 4 to add additional waypoints to the route. 5. Press MENU > select Start Navigation. Navigating a Route 1. Press MENU twice > select Routes. 2. Select a saved route > Navigate. NOTE: To stop navigating, press MENU > select Stop Navigation. 10 GPS 72H Quick Start Manual
-
 1
1 -
2
-
3
-
4
-
 5
5 -
 6
6 -
 7
7 -
 8
8 -
 9
9 -
 10
10 -
 11
11 -
 12
12
 |
 |
