Garmin GPSMAP 196 Yoke Mount Instructions - Page 2
To attach the yoke mount to the yoke shaft or control arm - used
 |
View all Garmin GPSMAP 196 manuals
Add to My Manuals
Save this manual to your list of manuals |
Page 2 highlights
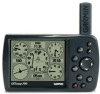
To attach the yoke mount to the yoke shaft or control arm: 1. Open the clamp by turning the clamp adjustment knob counter-clockwise until it can be easily placed over the yoke shaft or control arm. 2. When in place, tighten the clamp adjustment knob. 3. Use the pivot knob to position the yoke mount. To install the GPSMAP 196/296/396 in the yoke mount: 1. Make required auxiliary power, mini USB, and remote GPS Cradle antenna cable connections on the back of the unit. Clip the Adjustment Knob GPSMAP 196/296/396 into the cradle of the yoke mount. GPSMAP 196/296/396 2. Slide the locking lever on the side of the cradle forward to secure the GPSMAP 196/296/396 in place. 3. Adjust the cradle for best viewing and operation of the GPSMAP 196/296/396, and then tighten the knob. 4. To remove the GPSMAP 196/296/396, slide back the locking lever on the the cradle, and then unclip the unit from the cradle. Locking Tab GPSMAP 196/296/396 Cradle Yoke Mount Assembly NOTE: You may need to readjust the GPSMAP 196/296/396 position to provide the best view of the display screen as lighting conditions change. To secure the cable on the top of the yoke mount: 1. Remove the screws securing the cable clamp. 2. Orient the cable and secure with the clamp. Cable Clamp 2 To reconfigure the yoke mount for center column yokes: 1. Loosen and remove the pivot knob spacer and rubber washer. 2. Rotate the clamp assembly 90o so that the clamp opening faces away from you. 3. Secure the clamp assembly to the rest of the yoke mount using the pivot knob, spacer, and rubber washer. Adjust the clamp angle before fully tightening the pivot knob. Yoke Mount in Conventional Configuration Rubber Washer Pivot Knob Spacer Clamp Assembly Yoke Mount in Forward-Facing Configuration 3
-
 1
1 -
 2
2
 |
 |
