Garmin GPSMAP 3210 Installation Instructions - Page 10
Final Wiring Connection - manual
 |
UPC - 753759053062
View all Garmin GPSMAP 3210 manuals
Add to My Manuals
Save this manual to your list of manuals |
Page 10 highlights
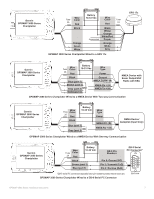
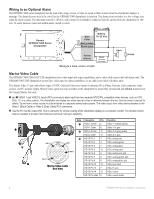
Final Wiring Connection After all the wiring is complete, the cables are attached on the backside of the GPSMAP 3000 series chartplotter. If the chartplotter is not connected to a Garmin Marine Network, be sure to firmly affix the weather cap over the open connector to limit corrosion of the contacts. The connection ports are labeled on the back of the chartplotter. To install the Power/NMEA, Marine Video, and Network Cables: 1. Align the notch and locking ring tab on the black Power/NMEA cable with the black POWER/NMEA port on the back of the unit. Carefully press the cable in until it is firmly seated. Do not force the cable, because this may damage the pins. 2. After the cable is seated, turn the locking ring clockwise until it stops. 3. Repeat S*teps 1 and 2, attaching the gray Marine Video cable to the gray VIDEO port on the back of the unit. 4. If you are connecting the GPSMAP 3000 series chartplotter to a Garmin Marine Network, insert the RJ-45 connector into the NETWORK port on the back of the unit and screw the locking ring in clockwise until it is firmly seated. With power applied to the circuit, test the installation by pressing the POWER key on the front of the unit. Refer to your GPSMAP 3000 series Owner's Manual for steps on initializing and using the chartplotter. Updating the Chartplotter Software Your GPSMAP 3000 series chartplotter may contain a software update Data card. If so, follow the instructions provided with the card. If a software update Data card is not included, visit www.garmin.com to make sure your chartplotter software is up-to-date. If your software is not up to date, follow the directions on www.garmin.com, or contact www.garmin.com/support. To determine the version of software on your chartplotter: 1. Hold ADJ/Menu to open the Main Menu. 2. Select System > Update to view the installed software version. For the latest free software updates (excluding map data) throughout the life of your Garmin products, visit the Garmin Web site at www.garmin.com. © 2008 Garmin Ltd. or its subsidiaries Garmin International, Inc. 1200 East 151st Street, Olathe, Kansas 66062, USA Garmin (Europe) Ltd. Liberty House, Hounsdown Business Park, Southampton, Hampshire, SO40 9RB UK Garmin Corporation No. 68, Jangshu 2nd Road, Shijr, Taipei County, Taiwan www.garmin.com Part Number 190-00991-02 Rev. A
-
 1
1 -
2
-
3
-
4
-
 5
5 -
 6
6 -
 7
7 -
 8
8 -
 9
9 -
 10
10
 |
 |