Garmin GPSMAP 64s Quick Start Manual - Page 3
Navigation - gps
 |
View all Garmin GPSMAP 64s manuals
Add to My Manuals
Save this manual to your list of manuals |
Page 3 highlights
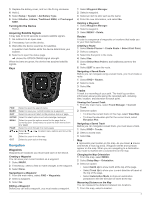
3 Replace the battery cover, and turn the D-ring clockwise. 4 Hold . 5 Select Setup > System > AA Battery Type. 6 Select Alkaline, Lithium, Traditional NiMH, or Precharged NiMH. Turning On the Device Hold . Acquiring Satellite Signals It may take 30 to 60 seconds to acquire satellite signals. 1 Go outdoors to an open area. 2 If necessary, turn on the device. 3 Wait while the device searches for satellites. A question mark flashes while the device determines your location. 4 Select to open the status page. shows the GPS/GLONASS signal strength. When the bars are green, the device has acquired satellite signals. Keys FIND MARK QUIT ENTER MENU PAGE IN OUT Select to open the search menu. Select to save your current location as a waypoint. Select to cancel or return to the previous menu or page. Select to select options and acknowledge messages. Select to open the options menu for the page that is currently open. Select twice to open the main menu (from any page). Select to scroll through the main pages. Select , , , or to select menu options and move the map cursor. Select to zoom in on the map. Select to zoom out on the map. Navigation Waypoints Waypoints are locations you record and store in the device. Creating a Waypoint You can save your current location as a waypoint. 1 Select MARK. 2 If necessary, select a field to make changes to the waypoint. 3 Select Done. Navigating to a Waypoint 1 From the main menu, select FIND > Waypoints. 2 Select a waypoint. 3 Select Go. Editing a Waypoint Before you can edit a waypoint, you must create a waypoint. 1 Select Waypoint Manager. 2 Select a waypoint. 3 Select an item to edit, such as the name. 4 Enter the new information, and select Go. Deleting a Waypoint 1 Select Waypoint Manager. 2 Select a waypoint. 3 Select MENU > Delete. Routes A route is a sequence of waypoints or locations that leads you to your final destination. Creating a Route 1 Select Route Planner > Create Route > Select First Point. 2 Select a category. 3 Select the first point in the route. 4 Select Use. 5 Select Select Next Point to add additional points to the route. 6 Select QUIT to save the route. Navigating a Saved Route Before you can navigate using a saved route, you must create a route. 1 Select FIND > Routes. 2 Select a route. 3 Select Go. Tracks A track is a recording of your path. The track log contains information about points along the recorded path, including time, location, and elevation for each point. Viewing the Current Track 1 From the main menu, select Track Manager > Current Track. 2 Select an option: • To show the current track on the map, select View Map. • To show the elevation plot for the current track, select Elevation Plot. Navigating a Saved Track Before you can navigate a saved track, you must save a track. 1 Select FIND > Tracks. 2 Select a saved track. 3 Select Go. Map represents your location on the map. As you travel, moves and leaves a track log (trail). Waypoint names and symbols appear on the map. When you are navigating to a destination, your route is marked with a colored line on the map. Changing the Map Orientation 1 From the map, select MENU. 2 Select Setup Map > Orientation. 3 Select an option: • Select North Up to show north at the top of the page. • Select Track Up to show your current direction of travel at the top of the page. • Select Automotive Mode to show an automotive perspective with the direction of travel at the top. Measuring Distance on the Map You can measure the distance between two locations. 1 From the map, select a location. 3
-
 1
1 -
 2
2 -
 3
3 -
 4
4 -
 5
5 -
 6
6
 |
 |