Garmin Monterra Quick Start Manual - Page 4
Navigating to a Destination, Camera and Photos, Downloading Geocaches, Customizing the Device - apps
 |
View all Garmin Monterra manuals
Add to My Manuals
Save this manual to your list of manuals |
Page 4 highlights
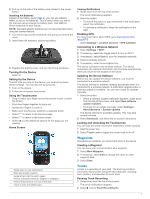
Customizing Your Track Log You can customize how your device displays and records tracks. 1 Select Settings > Tracks. 2 Select Record to toggle track logging on or off. 3 Select Show on Map to toggle the track log on the map on or off. When this feature is enabled, a line on the map indicates your track. 4 Select Color, and select a color for the track log on the map. 5 Select Record Method. 6 Select an option: • To record tracks at a variable rate that creates an optimum representation of your tracks, select Auto. • To record tracks at a specified distance, select Distance. • To record tracks at a specified time, select Time. 7 Select Interval. 8 Complete an action: • If you selected Auto for the Record Method, select an option to record tracks more or less often. NOTE: Using the Most Often interval provides the most track detail, but fills up the device memory quicker. • If you selected Distance or Time for the Record Method, enter a value, and select OK. Navigating to a Destination 1 Select Where To?. 2 Select a category. 3 Select a destination. 4 Select Go. The map opens with your route marked with a magenta line. 5 Navigate using the map (page 4) or compass (page 4). Navigating with the Map 1 Begin navigating to a destination (page 4). 2 Select Map. A blue triangle represents your location on the map. As you travel, the blue triangle moves and leaves a track log (trail). 3 Complete one or more actions: • Drag the map to view different areas. • Select and to zoom in and out of the map. • Select a location on the map (represented by a pin), and select the information bar at the top of the screen to view information about the selected location. Navigating with the Compass When navigating to a destination, points to your destination, regardless of the direction you are moving. 1 Begin navigating to a destination (page 4). 2 Select Compass. 3 Turn until points toward the top of the compass, and continue moving in that direction to the destination. Following Your Track Log While navigating, you can navigate back to the beginning of your track log. This can be helpful when finding your way back to camp or the trail head. 1 Select Track Manager > Current Track > View Map > TracBack. The map displays your route with a magenta line, start point, and end point. 2 Navigate using the map or the compass. Stopping Navigation From the map or compass, select > Stop Navigation. Camera and Photos You can take photos and videos with your device. If enabled, the geographic location is automatically saved in the photo or video information. You can navigate to the location. Taking a Photo 1 Select Camera. 2 Turn the device horizontally or vertically to change the orientation of the photo. 3 If necessary, select one or more options to customize the photo: • To change shooting options, including flash, exposure, white balance, scene, or location information, select . • To zoom in or out, use the slider. • To change the focus, select a part of the image. The device focuses on the area inside of the square brackets. When the photo is in focus, the square brackets turn green. 4 Select to take a photo. Downloading Geocaches 1 Connect your device to a computer using the USB cable. 2 Go to www.opencaching.com. 3 If necessary, create an account. 4 Sign in. 5 Follow the on-screen instructions to find and download geocaches to your device. Customizing the Device Adjusting the Backlight Brightness Extensive use of screen backlighting can significantly reduce battery life. You can adjust the backlight brightness to maximize the battery life. NOTE: The backlight brightness may be limited when the battery is low. 1 Select > Settings > Display > Brightness. 2 Use the slider to adjust the backlight level. The device may feel warm when the backlight setting is high. Adding a Shortcut or Widget to the Home Screen 1 From the home screen, swipe left or right on the screen to select a page. 2 Select . 3 If necessary, swipe left or right to view additional apps and widgets. 4 Hold an app or widget, and drag it to the desired location on the home screen. Changes to the home screen are saved to the selected profile (page 4). Profiles Profiles are a collection of settings that optimize your device based on how you are using it. For example, the settings and views are different when you use the device for hunting than when geocaching. When you are using a profile and you change settings, such as data fields or units of measurement, the changes are saved automatically as part of the profile. 4
-
 1
1 -
 2
2 -
 3
3 -
 4
4 -
 5
5 -
 6
6
 |
 |
