Garmin Rino 750 Owners Manual - Page 6
Turning On the Device, Device Operation, Acquiring GPS Signals - by
 |
View all Garmin Rino 750 manuals
Add to My Manuals
Save this manual to your list of manuals |
Page 6 highlights
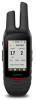
Installing AA Batteries Instead of the Lithium-Ion battery pack (Installing the Lithium-ion Battery, page 1), you can use four alkaline, NiMH, or lithium AA batteries with an optional AA battery pack (not included). This is useful when you are on the trail and cannot charge the LithiumIon battery pack. Use NiMH or lithium batteries for best results. The AA battery pack contains two parts. 1 If necessary, turn the D-ring counter-clockwise, and pull up to remove the battery pack from the device. 2 Push down on the lever inside the AA battery pack to À separate the two parts . Á 3 Insert four AA batteries, observing polarity. 4 Starting at the bottom, connect the two parts of the battery pack together and press until the top locks into place. 5 Align the metal contacts on the battery pack with the metal contacts on the back of the device. 6 Press and hold the battery pack in place. 7 Turn the D-ring clockwise to secure the battery pack onto the device. Turning On the Device Hold . Device Operation You can operate this device using a combination of hardware key and touchscreen actions. Widgets À Swipe down to view widgets (Viewing Widgets, page 5). Á (Call key) Select to transmit an attention tone on the current channel. Hold to send an emergency alert (Emergency Alerts, page 4). You can customize the function of this key (Customizing the Keys, page 14). Select to adjust the backlight.  (Power key) Hold to turn the device on or off. PTT Hold to transmit on the current radio channel à (Push-to-talk) (Transmitting, page 3). Main menu Ä Select the radio dashboard at the top of the main menu to launch the radio app. You can customize the dashboard on the main menu (Customizing the Dashboard on the Main Menu, page 14). Select the shortcuts to launch applications. You can customize the shortcuts on the main menu (Customizing the Main Menu, page 14). Volume keys Select to adjust the volume. Å Swipe up to open apps and Connect IQ™ apps. Æ (App drawer) Opening the App Drawer The app drawer contains all of the applications used to operate this device. 1 From the main menu, swipe up from the bottom of the screen. 2 Swipe down from the top of the screen to return to the main menu without launching an application (optional). Locking the Touchscreen You can lock the screen to prevent inadvertent screen touches. Select > . Acquiring GPS Signals When you turn on your navigation device, the GPS receiver must collect satellite data and establish the current location. The time required to acquire satellite signals varies based on several factors, including how far you are from the location where you last used your navigation device, whether you have a clear view of the sky, and how long it has been since you last used your navigation device. The first time you turn on your navigation device, it may take several minutes to acquire satellite signals. 1 Turn on the device. 2 Wait while the device locates satellites. 3 If necessary, go to an open area, away from tall buildings and trees. in the status bar indicates the satellite signal strength. When at least half the bars are filled, the device is ready for navigation. 2 Introduction
-
 1
1 -
 2
2 -
 3
3 -
 4
4 -
 5
5 -
 6
6 -
 7
7 -
 8
8 -
 9
9 -
 10
10 -
 11
11 -
 12
12 -
13
-
14
-
15
-
16
-
17
-
18
-
19
-
20
-
21
-
22
-
23
-
24
-
25
-
26
-
27
-
28
-
29
-
30
 |
 |
