Garmin VIRB Elite Aviation Bundle Quick Start Manual - Page 3
Turning On the Device, Turning Off the Device, Modes
 |
View all Garmin VIRB Elite Aviation Bundle manuals
Add to My Manuals
Save this manual to your list of manuals |
Page 3 highlights
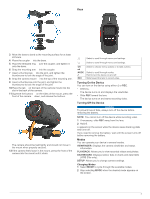
Keys 3 Allow the base to bond to the mounting surface for at least 24 hours. 4 Place the coupler Á into the base. 5 Place the threaded ring  over the coupler, and tighten it onto the base. 6 Snap the mounting arm à into the coupler. 7 Insert a thumbscrew Ä into the joint, and tighten the thumbscrew to lock the angle of the joint. 8 Snap the camera mount Å into the top of the mounting arm. 9 Insert a thumbscrew into the joint, and tighten the thumbscrew to lock the angle of the joint. 10Place the tab Æ on the back of the camera mount into the slot in the back of the camera. 11Squeeze the buttons Ç on the sides of the mount, press the front of the camera È down, and release the buttons. The camera should be held tightly and should not move in the mount when properly secured. 12If the camera feels loose in the mount, press the front of the camera into the mount until it clicks. Select to scroll through menus and settings. Select to scroll through menus and settings. OK Select to choose menu options or to take a photo. MODE REC Select to scroll through modes. Hold to turn the device on and off. Slide toward the lens to record video. Turning On the Device You can turn on the device using either or REC. • Select . The device turns on and displays the viewfinder. • Slide REC toward the lens. The device turns on and starts recording video. Turning Off the Device NOTICE To prevent loss of data, always turn off the device before removing the battery. NOTE: You cannot turn off the device while recording video. 1 If necessary, slide REC away from the lens. 2 Hold . appears on the screen while the device saves track log data and turns off. If you need to remove the battery, wait until the screen turns off before removing the battery. Modes You can operate your device in several modes. VIEWFINDER: Displays the camera viewfinder and status information. PLAYBACK: Allows you to view recorded videos and photos. DASHBOARD: Displays sensor data in charts and data fields (VIRB Elite only). SETUP: Allows you to change camera settings. Changing Modes 1 Select MODE to cycle through the available modes. 2 Stop selecting MODE when the desired mode appears on the screen. 3
-
 1
1 -
 2
2 -
 3
3 -
 4
4 -
 5
5 -
 6
6
 |
 |
