Garmin VIRB Elite Aviation Bundle Quick Start Manual - Page 4
Video, Photos, Playback, Dashboards, Tracks, Device Information
 |
View all Garmin VIRB Elite Aviation Bundle manuals
Add to My Manuals
Save this manual to your list of manuals |
Page 4 highlights
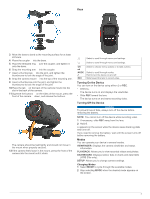
Video Recording a Video NOTE: If the battery power becomes very low while recording video, the device automatically stops recording, saves the video, and safely turns off. 1 Slide REC toward the lens to start recording video. If the device is off, it turns on automatically. The device starts recording video immediately. 2 Slide REC away from the lens to stop recording video. The video is saved on the memory card as an MP4 file, and the track log for the video is saved on the memory card as a GPX file. Video Settings Select MODE > SETUP > VIDEO. Mode: Sets the resolution, aspect ratio, and frame rate. Field of View: Sets the zoom level. Loop: Enables loop recording and sets the number of minutes of video to store when recording a video loop. Auto Record: Enables automatic recording. When Moving automatically starts recording when the device is in motion. Ski Mode automatically starts recording when the device is moving downhill (VIRB Elite only). Microphone: Enables the microphone. Advanced Recording Settings Select MODE > SETUP > ADVANCED. Lens Correct: Corrects wide-angle barrel distortion and reduces the field of view. Automatically sets Field of View to Ultra-Zoom in the video settings. Stabilize: Turns on image stabilization to reduce shaky video. Automatically enables Lens Correct. Flip Camera: Sets the camera to capture video and images with the screen facing up or down. This Side Down captures correctly oriented video and photos with the screen facing downward. Photos Taking a Photo Your device provides several methods for taking a photo. • Select MODE > VIEWFINDER, aim the camera using the viewfinder, and select . • From anywhere except the playback screen, hold . The device displays the photo briefly and returns to the page you were using. • While recording a video, select to capture a photo at the same resolution as the video recording. Photos taken while recording a video always use normal photo mode. Burst mode is ignored while recording video. Photos Settings Select MODE > SETUP > Photos. Resolution: Sets the photo resolution. Mode: Sets the shooting mode. Burst mode takes several photos in quick succession to capture a specific instance, such as the finish line during a race. Self Timer: Sets the timer to delay taking a photo. Repeat On automatically repeats the time interval and captures a photo until you press again. Date Stamp: Adds a date stamp to your photo. Playback Viewing Photos and Videos You can view your photos and recorded videos on the device screen. 1 Select MODE > PLAYBACK. 2 Select and to select a photo or video. Videos are indicated with . 3 Select OK. You can control video playback using the on-screen controls. Deleting Photos and Videos 1 Select MODE > PLAYBACK. 2 Select and to select a photo or video. 3 Select OK > . Dashboards NOTE: This feature is available for VIRB Elite only. A dashboard is a grouping of data fields, charts, or graphs of data from the device sensors and connected ANT +™ sensors. The dashboards provide real-time and historical views of the sensor data recorded to the track log. Viewing the Dashboards 1 Select MODE > DASHBOARD. 2 Select or to scroll through the dashboards. Pairing Your ANT + Sensors When you pair a compatible ANT + sensor with your device, the sensor data is included in the track log, and you can view dashboards for the sensor data. 1 Turn on the sensor, and bring the device and sensor within 10 ft. (3 m) of each other. 2 On the device, select MODE > SETUP > SENSORS. 3 On the device, select the type of sensor to pair. The icon for the sensor blinks. When the icon turns solid, the sensor is paired and connected. Tracks NOTE: This feature is available for VIRB Elite only. A track is a recording of your path. The track log contains information about points along the recorded path, such as time, location, and elevation for each point. If you have paired ANT + sensors with your device, data from connected sensors is included in the track log. The device records a continuous track log while it is on. This track is saved as a FIT file on the memory card each time you turn off the device. The device also records a separate track log for each video recording. Video track logs are saved as GPX files on the memory card each time you stop recording video. The track logs include track point data at one-second intervals. You can view GPX and FIT track logs on your computer using the BaseCamp™ application. Go to www.garmin.com/ basecamp for more information. You can also view and upload FIT track logs to Garmin Connect™. Go to http: / / connect .garmin .com for more information. Device Information System Settings Select MODE > SETUP > SYSTEM. GPS: Enables the device to receive GPS satellite signals. When Recording enables GPS reception only when the camera is recording video (VIRB Elite only). Record Light: Turns the recording light on or off. 4
-
 1
1 -
 2
2 -
 3
3 -
 4
4 -
 5
5 -
 6
6
 |
 |
