Garmin Varia Rearview Radar Owners Manual - Page 5
Getting Started, Tips for Installing the Taillight
 |
View all Garmin Varia Rearview Radar manuals
Add to My Manuals
Save this manual to your list of manuals |
Page 5 highlights
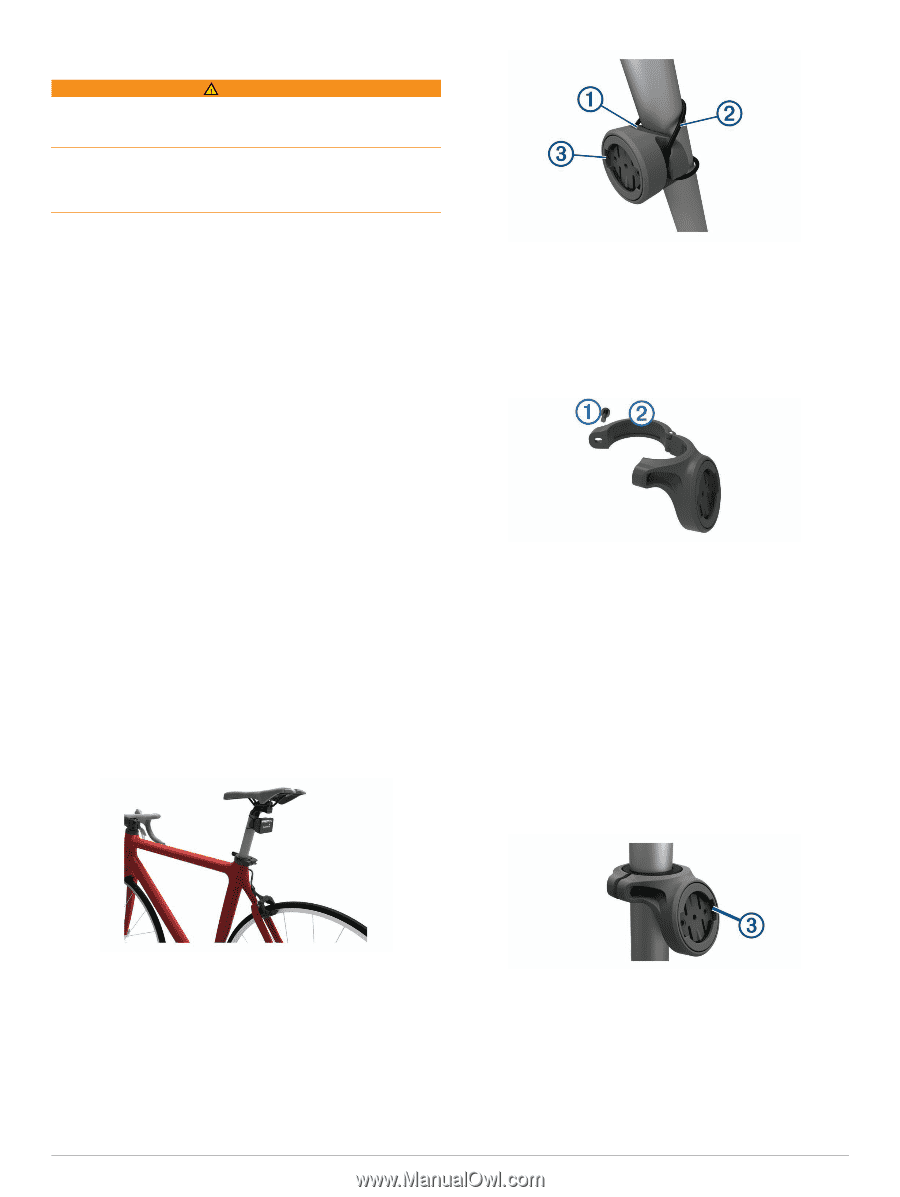
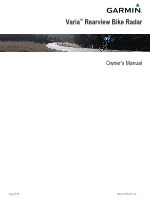
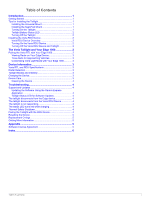
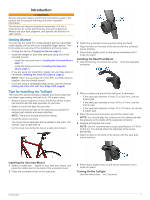
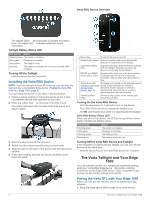
Introduction WARNING See the Important Safety and Product Information guide in the product box for product warnings and other important information. The device can improve situational awareness. It is not a replacement for cyclist attentiveness and good judgement. Always use your best judgment, and operate the bicycle in a safe manner. Getting Started You can use the Varia RTL (radar taillight) with the Varia RDU (radar display unit) or with your compatible Edge® device. This list provides an overview of the installation and setup tasks. • Charge the device (Charging the Device, page 3). • Install the taillight on your bike seat post using one of the included mounts: ◦ Install the universal mount (Installing the Universal Mount, page 1). ◦ Install the seat-post mount (Installing the Seat-Post Mount, page 1). • If you are using the Varia RDU, install it on your bike stem or handlebar (Installing the Varia RDU Device, page 2). NOTE: When you purchase the Varia RTL and RDU devices together, they are already paired. • If you are using a compatible Edge device, pair the devices (Pairing the Varia RTL with Your Edge 1000, page 2). Tips for Installing the Taillight The Varia RTL device includes a taillight and micro radar that can detect approaching vehicles up to 140 meters away. • Select a secure location to mount the device where it does not interfere with the safe operation of your bike. • Select a mount that best fits your bike. • Mount the device as high on the seat post as possible for optimal light visibility and radar detection. NOTE: The mount surface should be vertical. • Install the device correctly. The device faces backward and is parallel to the road. The Garmin® logo is right-side up. • Go for a test ride during the day in a safe environment. 3 Attach the universal mount securely using one band . Á 4 Align the tabs on the back of the device with the universal mount notches . Â 5 Press down slightly and turn the device clockwise until it locks into place. Installing the Seat-Post Mount 1 Use the hex key to remove the screw from the seat-post À connector . Á 2 Place a rubber pad around the seat post, if necessary: • If the seat post diameter is from 27 to 28.6 mm, use the thicker pad. • If the seat post diameter is from 30.4 to 31 mm, use the thinner pad. • If the seat post diameter is from 31 to 31.8 mm, do not use a rubber pad. 3 Place the seat-post connector around the rubber pad. NOTE: You should align the contours on the rubber pad with the grooves on the inside of the seat-post connector. 4 Replace and tighten the screw. NOTE: Garmin recommends a torque specification of 7 lbf-in. (0.8 N-m). You should check the tightness of the screw periodically. 5 Align the tabs on the back of the device with the seat-post mount notches . Â Installing the Universal Mount 1 Select a rubber pad based on your seat post shape, and À place the rubber pad on the back of the universal mount. 2 Place the universal mount on the seat post. 6 Press down slightly and turn the device clockwise until it locks into place. Turning On the Taillight Hold the device key for 2 seconds. À Introduction 1
-
 1
1 -
 2
2 -
 3
3 -
 4
4 -
 5
5 -
 6
6 -
 7
7 -
 8
8 -
 9
9 -
 10
10 -
 11
11 -
12
 |
 |