Garmin Varia Vision In-sight Display Owner s Manual - Page 5
Charging the Device, Device Overview, Using the Touch Panel, Installing the Mount on Your Sunglasses - test
 |
View all Garmin Varia Vision In-sight Display manuals
Add to My Manuals
Save this manual to your list of manuals |
Page 5 highlights
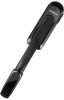
Introduction WARNING See the Important Safety and Product Information guide in the product box for product warnings and other important information. Always consult your physician before you begin or modify any exercise program. Charging the Device NOTICE To prevent corrosion, thoroughly clean and dry the contacts and the surrounding area before charging or connecting to a computer. Refer to the cleaning instructions in the appendix. The device is powered by a built-in lithium-ion battery that you can charge using a standard wall outlet or a USB port on your computer. NOTE: The device does not charge when outside the approved temperature range (Specifications, page 2). 1 Align the charger posts with the contacts on the back of the device , and press the charger until it clicks. À 2 Plug the large end of the USB cable into an AC adapter or a computer USB port. 3 Plug the AC adapter into a standard wall outlet. 4 Charge the device completely. 5 Pinch the buttons to remove the charger. Á Device Overview • When On Demand/Alert Only is enabled, double-tap the touch panel to wake up and put the device into sleep mode. Installing the Mount on Your Sunglasses 1 Select a band size that fits your sunglasses arm. NOTE: The band should be tight so the device does not move while riding. 2 Place the flat side of the mount against the sunglasses arm. 3 Attach the first band on the top hook and pull it around the sunglasses arm. 4 Attach the other side of the band on the bottom hook. 5 Attach the second band. Installing the Device on the Mount Before you can install the device on the mount, you must install the mount on your sunglasses arm. 1 Align the notches on the mount and the device. 2 Press down slightly and turn the device until it locks into place. Power key À Ambient light Á sensor Touch panel  Display arm à Display Ä Hold to turn the device on and off. Automatically detects available light and adjusts the brightness of the display. Swipe or tap to interact with device (Using the Touch Panel, page 1). Bend to adjust the display. NOTE: Bending the display arm more than 90 degrees, could damage the device. Twist to adjust the location of the display. NOTE: Twisting the display more than 15 degrees, could damage the device. Using the Touch Panel You can use the touch panel to interact with many device features. You can operate the touch panel with your finger tip or while wearing gloves. • Swipe the touch panel to scroll through data screens, options, and settings. You can swipe forward and backward. • Swipe the touch panel to dismiss notifications. • Swipe the touch panel to acknowledge notifications and alerts. 3 Adjust the display in front of the sunglasses lens. Tips for Installing the Varia Vision Device • Select a secure location to mount the device on your sunglasses arm, where it does not interfere with the safe operation of your bike. • Select the bands that best fit your sunglasses. • Install the device correctly. • Adjust the display before going for a ride. • Go for a test ride during the day in a safe environment. Tips for Adjusting the Display • Unfold the sunglasses arms before you adjust the display. • Place the mount in a location where the display reaches the sunglasses lens. • Bend the display arm. • Rotate the display. • Move the mount forward and backward on the sunglasses arm. Introduction 1
-
 1
1 -
 2
2 -
 3
3 -
 4
4 -
 5
5 -
 6
6 -
 7
7 -
 8
8 -
 9
9 -
 10
10
 |
 |
