Garmin Xero S1 Trapshooting Trainer Owners Manual - Page 5
Device Overview, Tripod Adjustments, Installing the Tripod
 |
View all Garmin Xero S1 Trapshooting Trainer manuals
Add to My Manuals
Save this manual to your list of manuals |
Page 5 highlights
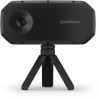
Getting Started WARNING This device is intended to provide accurate aiming solutions based on calibrated measurements of current conditions only. Depending on your environment, conditions may change rapidly. Changes in environmental conditions, like wind gusts or downrange winds, may have an effect on the accuracy of your shot. Aiming solutions are suggestions only based upon your input into the device. Always allow a margin of safety for changing conditions and reading errors. Always inspect your equipment before using a firearm. You are responsible for understanding and complying with any applicable regulations for using a firearm. Always understand your target and what lies beyond your target before taking a shot. Failure to account for your shooting environment could cause property damage, injury, or death. See the Important Safety and Product Information guide in the product box for product warnings and other important information. The Xero S1 Trapshooting Trainer helps you improve your trapshooting score by tracking a clay target and your shot using a combination of sensors. The device can track orange, green, and pink clays in both 108 mm and 110 mm sizes. Other sizes and colors are not supported. NOTE: This device is intended to track one clay and one shot at a time. Doubles trap and trap games that allow multiple shots are not supported. Device Overview Touchscreen Protective cover Swipe to scroll through features, data screens, and menus. Tap to select. Remove before using the device. Replace when not in use. Tripod Adjustments The tripod adjustment controls are located on the underside of the Xero S1 device. Tripod adjustment button Tripod release lever Adjusts the angle of the Xero S1 device on the tripod ball mount Opens the socket to install or remove the tripod ball mount Installing the Tripod 1 Screw the tripod ball mount onto the tripod assembly . NOTE: You should tighten the tripod ball mount so it does not move during use. The tripod ball mount uses 1/4"-20 thread size and is compatible with most tripods. For best performance, do not raise the device beyond waist height or a total height of 1.2 m (4 ft.). 2 Completely depress and hold the tripod release lever . Power button Micro-USB power and data port (under weather cap) Press to turn on the device. Hold to turn off the device. Connect the included USB cable to charge the device or transfer data using your computer. Getting Started 1
-
 1
1 -
 2
2 -
 3
3 -
 4
4 -
 5
5 -
 6
6 -
 7
7 -
 8
8 -
 9
9 -
 10
10 -
 11
11 -
12
-
13
-
14
 |
 |
