Garmin babyCam Owner s Manual - Page 5
Getting Started, Installation
 |
View all Garmin babyCam manuals
Add to My Manuals
Save this manual to your list of manuals |
Page 5 highlights
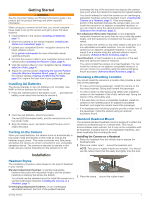
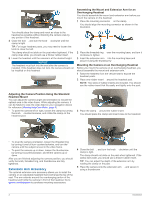
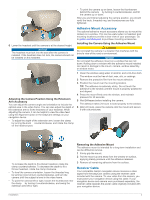
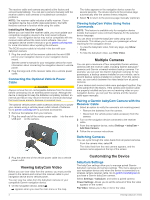
Getting Started WARNING See the Important Safety and Product Information guide in the product box for product warnings and other important information. When using your camera the first time, you should complete these tasks to set up the camera and get to know the basic features. 1 Install batteries in the camera (Installing AA Batteries, page 1). 2 Mount the camera on the vehicle headrest (Installing the Camera on a Headrest, page 1). 3 Update your compatible Garmin® navigation device to the latest software version. Go to garmin.com/express for more information about updating software. 4 Connect the receiver cable to your navigation device and to vehicle power (Installing the Receiver Cable, page 4). 5 View the camera video on your navigation device (Viewing babyCam Video, page 4). 6 Adjust the camera position (Adjusting the Camera Position Using the Standard Headrest Mount, page 2), and change the camera settings (Flipping and Mirroring the Video, page 5) to capture the best view of your passenger. Installing AA Batteries The device operates on two AA batteries (not included). Use NiMH or lithium batteries for best results. 1 Press the indented area in the battery cover , and slide the À battery cover away from the lens to remove it. 2 Insert two AA batteries, observing polarity. The red LED illuminates briefly, and the camera turns on in low power mode. 3 Align the battery cover, and slide it toward the lens until in snaps into place. Turning on the Camera When you install batteries, the camera turns on automatically in low power mode and remains in this mode as long as the batteries supply power. This mode consumes very little power and allows the camera to remain connected to your compatible navigation device. The camera is intended to operate in this mode, and you cannot manually turn the camera on or off. Installation overhangs the top of the seat and may obscure the camera view even when the headrest is raised to the highest position. You should attempt to install the camera on an overhanging adjustable headrest using the standard mount (Installing the Camera on a Headrest, page 1). If the overhanging portion of the headrest obscures the camera view, you can install the camera on an adjacent compatible headrest, or you can install it using the optional extension arm accessory (Extension Arm Accessory, page 2). Non-Adjustable Removable Headrest: A non-adjustable removable headrest has posts that do not provide adjustable height, and the headrest is not locked into the seat when raised. Do not attach the camera or any other object to the post of a non-adjustable removable headrest. You can install the camera on an adjacent compatible headrest, or you can mount it on a window using the optional adhesive mount accessory (Adhesive Mount Accessory, page 3). Fixed Headrest: A fixed headrest is an extension of the seat back and cannot be raised or removed. You cannot install the camera on a fixed headrest. You can install the camera on an adjacent compatible headrest, or you can mount it on a window using the optional adhesive mount accessory (Adhesive Mount Accessory, page 3). Choosing a Mounting Location You should install the camera in a location that provides a clear view of the passenger. • To view a front-facing passenger, install the camera on the front seat headrest, facing back toward the passenger. • To view a child in a rear-facing child safety seat, install the camera on the headrest of the child's vehicle seat, facing the interior of the child safety seat. • If the seat does not have a compatible headrest, install the camera on the nearest post of an adjacent compatible headrest, and angle the camera toward the passenger. • If no headrest post mounting locations provide a clear view of the passenger, install the camera using an optional accessory mount. Standard Headrest Mount The included standard headrest mount is designed to attach the camera to a headrest post in a vehicle seat. This mount accommodates most vehicles, but it may not be compatible with all headrests, including fixed or non-adjustable headrests, and some headrests that overhang the seat. Installing the Camera on a Headrest 1 Raise the headrest from the vehicle seat to expose the headrest posts. 2 Place one rubber insert around the headrest post. À NOTE: Two sizes of rubber inserts are included. You should use the rubber insert that fits easily and tightly onto the post. Headrest Styles The installation procedure varies based on the style of headrest in your vehicle. Standard Adjustable Headrest: A standard adjustable headrest has posts with adjustable height, and the padded headrest is relatively flat across the bottom. You should use the standard mount to install the camera on a standard adjustable headrest (Installing the Camera on a Headrest, page 1). Overhanging Adjustable Headrest: On an overhanging adjustable headrest, the front of the padded headrest 3 Place the clamp around the rubber insert. Á Getting Started 1
-
 1
1 -
 2
2 -
 3
3 -
 4
4 -
 5
5 -
 6
6 -
 7
7 -
 8
8 -
 9
9 -
 10
10
 |
 |