Garmin babyCam Owner s Manual - Page 6
Extension Arm Accessory
 |
View all Garmin babyCam manuals
Add to My Manuals
Save this manual to your list of manuals |
Page 6 highlights
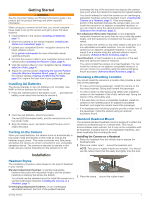
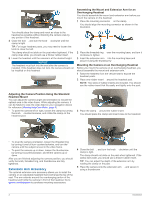
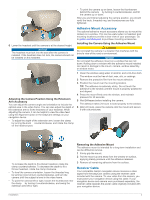
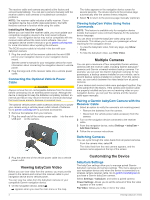
Assembling the Mount and Extension Arm for an Overhanging Headrest You should assemble the mount and extension arm before you mount the camera on the headrest. 1 Place the mounting connector on the clamp . À Á You should align the mounting connector as shown in the illustration. You should place the clamp and insert as close to the headrest as possible without blocking the camera view by any portion of the headrest. 4 Close the bolt , and turn the knob clockwise until the  à clamp is tight. TIP: For larger headrest posts, you may need to loosen the knob to close the bolt. The clamp should not slide on the post when tightened. If the clamp does slide, you should use a thicker rubber insert. 5 Lower the headrest until the camera is at the desired height. NOTICE The headrest must lock into the seat after the camera is installed. If the headrest does not lock, the camera should not be installed on this headrest. 2 Place the threaded ring over the mounting base, and turn it  clockwise to tighten. 3 Insert the extension arm into the mounting base and à secure it using the thumbscrew . Ä Mounting the Camera on an Overhanging Headrest Before you mount the camera on an overhanging headrest, you should assemble the mount and extension arm. 1 Raise the headrest from the vehicle seat to expose the headrest posts. 2 Place one rubber insert around the headrest post. À NOTE: Two sizes of rubber inserts are included. You should use the rubber insert that fits easily and tightly onto the post. Adjusting the Camera Position Using the Standard Headrest Mount You can adjust the camera angle and orientation to include the optimal area in the video frame. While adjusting the camera, it can be helpful to view the video feed on your navigation device for reference (Viewing babyCam Video, page 4). • To point the camera left or right, loosen the clamp by turning the knob counterclockwise, and rotate the clamp on the À headrest post. 3 Place the clamp around the rubber insert. Á You should place the clamp and insert close to the headrest. • To level the camera orientation, loosen the threaded ring Á by turning it one full turn counterclockwise, and turn the camera until the subject is level in the video frame. • To point the camera up or down, loosen the thumbscrew  by turning it counterclockwise, and tilt the camera up or down. After you are finished adjusting the camera position, you should verify the knob, threaded ring, and thumbscrew are fully tightened. Extension Arm Accessory The optional extension arm accessory allows you to install the camera on an adjustable headrest that overhangs the top of the seat. The arm extends around the overhanging portion of the headrest and holds the camera in front of the headrest. Go to garmin.com/babycam to purchase mounting accessories. 4 Close the bolt , and turn the knob clockwise until the  à clamp is tight. The clamp should not slide on the post when tightened. If the clamp does slide, you should use a thicker rubber insert. TIP: You can adjust the depth of the extension arm by rotating the clamp on the post. 5 Place the camera onto the extension arm , and secure it Ä using a thumbscrew . Å 2 Installation
-
 1
1 -
 2
2 -
 3
3 -
 4
4 -
 5
5 -
 6
6 -
 7
7 -
 8
8 -
 9
9 -
 10
10
 |
 |
