Garmin eTrex H Owner's Manual - Page 21
TRACBACK, DELETE, To clear the current Track Log, To show a map of a saved track
 |
UPC - 753759072858
View all Garmin eTrex H manuals
Add to My Manuals
Save this manual to your list of manuals |
Page 21 highlights
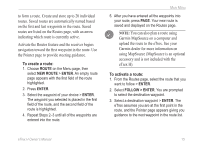
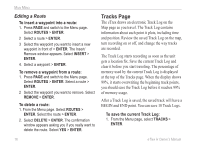
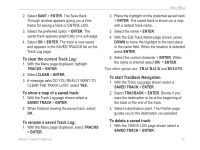
Main Menu 2. Select SAVE > ENTER. The Save Back Through window appears giving you a time frame for saving a track or ENTIRE LOG. 3. Select the preferred option > ENTER. The saved track appears graphically on a sub-page. 4. Select OK > ENTER. The track is now saved and appears in the SAVED TRACKS list on the Track Log page. To clear the current Track Log: 1. With the Menu page displayed, highlight TRACKS > ENTER. 2. Select CLEAR > ENTER. 3. A message asks DO YOU REALLY WANT TO CLEAR THE TRACK LOG?, select YES. To show a map of a saved track: 1. With the Track Log page shown select a SAVED TRACK > ENTER. 2. When finished viewing the saved track, select OK. 2. Place the highlight on the preferred saved track > ENTER. The saved track is shown on a map with a default track name. 3. Select the name > ENTER. 4. With the Edit Track Name page shown, press DOWN to move the highlight to the next place in the name field. When the location is selected, press ENTER. 5. Select the correct character > ENTER. When the name is entered select OK > ENTER. Two other options are: TRACBACK and DELETE. To start TracBack Navigation: 1. With the Track Log page shown select a SAVED TRACK > ENTER. 2. Select TRACBACK > ENTER. Decide if you want the destination to be at the beginning of the track or the end of the track. 3. Select a destination point. The Pointer page guides you to the destination you selected. To rename a saved Track Log: 1. With the Menu page displayed, select TRACKS > ENTER. To delete a saved track: 1. With the TRACK LOG page shown select a SAVED TRACK > ENTER. eTrex H Owner's Manual 17
-
 1
1 -
2
-
3
-
4
-
5
-
6
-
7
-
8
-
9
-
10
-
11
-
12
-
13
-
14
-
15
-
 16
16 -
 17
17 -
 18
18 -
 19
19 -
 20
20 -
 21
21 -
 22
22 -
 23
23 -
 24
24 -
 25
25 -
 26
26 -
27
-
28
-
29
-
30
-
31
-
32
 |
 |
