Garmin echo 201 Owners Manual - Page 8
Showing and Adjusting the Depth Line, Configuring the Appearance of Suspended, Targets, Turning
 |
View all Garmin echo 201 manuals
Add to My Manuals
Save this manual to your list of manuals |
Page 8 highlights
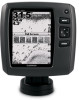
Showing and Adjusting the Depth Line You can show and adjust a horizontal line on a sonar screen. The depth of the line is indicated on the right side of the screen. NOTE: Showing a depth line on one page displays the depth line on all the pages. 1 Select MENU > Depth Line > On. 2 Select or . Configuring the Appearance of Suspended Targets NOTE: Configuring the appearance of suspended targets on one page applies that setting to all pages. NOTE: This feature is not available on all transducers. Shows suspended targets as symbols. Shows suspended targets as symbols with target depth information. Shows suspended targets as symbols with background sonar information. Shows suspended targets as symbols with background sonar information and target depth information. 1 From a sonar view, select MENU > Setup > Sonar Setup > Fish Symbols. 2 Select an option. Turning on the A-Scope The a-scope is a vertical flasher along the right side of the fullscreen sonar view. This feature expands the most recently received sonar data so that it is easier to see. It can also be helpful for detecting fish that are close to the bottom. NOTE: This feature is not available on all transducers. From the full screen page, select MENU > Setup > Sonar Setup > A-Scope > On. A-Scope À Diameter of the sonar cone at the present depth Á Sonar Gain and Noise Settings You can adjust the amount of gain and noise on a sonar screen. The gain setting controls the sensitivity of the sonar receiver to compensate for water depth and water clarity. Increasing the gain shows more detail, and decreasing the gain reduces screen clutter. NOTE: Setting the gain on one page applies the setting to all the pages. Setting the Gain Manually 1 Select MENU > Gain > Manual. 2 Select until you begin to see noise in the water portion of the screen. 3 Select to decrease the gain slightly. Setting the Gain Automatically NOTE: To set the gain on the split frequency page, you must set each frequency separately. 1 Select MENU > Gain. 2 Select an option: • To display higher-sensitivity, weaker sonar returns with more noise automatically, select Auto-High. • To display medium-sensitivity sonar returns with moderate noise automatically, select Auto-Med. • To display lower-sensitivity sonar returns with less noise automatically, select Auto-Low. Setting Noise Rejection You can decrease the appearance of weak sonar returns by increasing noise rejection. NOTE: Setting noise rejection on one page applies that setting to all pages. NOTE: To set noise rejection on the split frequency page, you must set each frequency separately. 1 Select MENU > Setup > Sonar Setup > Noise Reject. 2 Set the level of noise rejection. Hiding Surface Noise You can hide or display the sonar returns near the surface of the water. Hiding surface noise helps reduce screen clutter. NOTE: Setting the surface noise to show or hide on one page applies that setting to all pages. Select MENU > Setup > Sonar Setup > Surface Noise > Hide. Adjusting the Contrast You can control the range and intensity of colors by adjusting the brightness and contrast for DownVü transducers. Contrast controls the range of colors between high intensity targets and low intensity noise. A high contrast setting displays a greater difference in coloring between noise and targets. A low contrast setting has more mid-tone colors. 1 Select MENU > Contrast. 2 Use the slider to increase or decrease the contrast. Adjusting the Color Intensity Brightness controls the intensity of the coloring. A higher brightness value makes targets easier to see by using higher intensity coloring. A lower brightness value hides background noise by using lower intensity coloring. 1 Select MENU > Brightness. 2 Select a manual value or select an option: • To display higher-sensitivity, weaker sonar returns with more noise automatically, select Auto-High. • To display medium-sensitivity sonar returns with moderate noise automatically, select Auto-Med. • To display lower-sensitivity sonar returns with less noise automatically, select Auto-Low. Alarms Select MENU > Setup > Alarms. Battery: Sounds when the battery reaches a specified low voltage. Deep Water: Sounds when the water depth is deeper than the specified depth. Drift: Sounds when depth variations at your present location exceed the specified depth. Fish: Sounds when the device detects a suspended target. 4 Sonar
-
 1
1 -
2
-
 3
3 -
 4
4 -
 5
5 -
 6
6 -
 7
7 -
 8
8 -
 9
9 -
 10
10 -
 11
11 -
 12
12
 |
 |
