Gateway NV-53 Service Guide - Page 102
and finally the bottom, Carefully pry loose the front panel from the LCD assembly lid. Start on
 |
View all Gateway NV-53 manuals
Add to My Manuals
Save this manual to your list of manuals |
Page 102 highlights
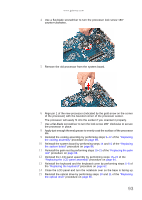
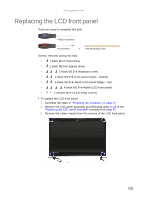
CHAPTER 3: Replacing notebook components 4 Remove the LCD front panel screws. 5 Remove the LCD hinge cover screws. 6 Carefully pry loose the front panel from the LCD assembly lid. Start on the top side (a), continue to the left and right sides (b), and finally the bottom side (c). 96
-
 1
1 -
2
-
3
-
4
-
5
-
6
-
7
-
8
-
9
-
10
-
11
-
12
-
13
-
14
-
15
-
16
-
17
-
18
-
19
-
20
-
21
-
22
-
23
-
24
-
25
-
26
-
27
-
28
-
29
-
30
-
31
-
32
-
33
-
34
-
35
-
36
-
37
-
38
-
39
-
40
-
41
-
42
-
43
-
44
-
45
-
46
-
47
-
48
-
49
-
50
-
51
-
52
-
53
-
54
-
55
-
56
-
57
-
58
-
59
-
60
-
61
-
62
-
63
-
64
-
65
-
66
-
67
-
68
-
69
-
70
-
71
-
72
-
73
-
74
-
75
-
76
-
77
-
78
-
79
-
80
-
81
-
82
-
83
-
84
-
85
-
86
-
87
-
88
-
89
-
90
-
91
-
92
-
93
-
94
-
95
-
96
-
 97
97 -
 98
98 -
 99
99 -
 100
100 -
 101
101 -
 102
102 -
 103
103 -
 104
104 -
 105
105 -
 106
106 -
 107
107 -
108
-
109
-
110
-
111
-
112
-
113
-
114
-
115
-
116
-
117
-
118
-
119
-
120
-
121
-
122
-
123
-
124
-
125
-
126
-
127
-
128
-
129
-
130
-
131
-
132
-
133
-
134
-
135
-
136
-
137
-
138
-
139
-
140
-
141
-
142
-
143
-
144
-
145
-
146
-
147
-
148
-
149
-
150
-
151
-
152
-
153
-
154
-
155
-
156
-
157
-
158
-
159
-
160
-
161
-
162
-
163
-
164
-
165
-
166
-
167
-
168
 |
 |

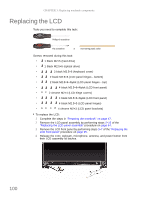
CHAPTER 3: Replacing notebook components
96
4
Remove the LCD front panel screws.
5
Remove the LCD hinge cover screws.
6
Carefully pry loose the front panel from the LCD assembly lid. Start on the
top side
(a)
, continue to the left and right sides
(b)
, and finally the bottom
side
(c)
.