GE 21098GE3 User Guide - Page 63
Area Code
 |
UPC - 044319401028
View all GE 21098GE3 manuals
Add to My Manuals
Save this manual to your list of manuals |
Page 63 highlights
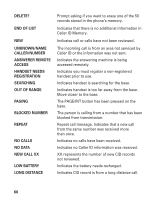
When REPLACE VIP# ? shows on the display, you must press the mute/prog button on the handset to confirm replacement. Reviewing And Deleting Stored VIP Melody Record 1. Press the mute/prog button to enter the VIP MELODY menu. 2. Use the cid/vol or buttons to scroll to the desired VIP Melody Record. 3. If you want to delete the information, press the del button on the handset while the entry displays. The display shows DELETE VIP# ?. 4. Press del again to confirm. You will hear a confirmation tone and VIP# DELETED shows on the display. Area Code 1. Press the cid/vol or buttons to scroll to the AREA CODE menu. 2.Press the mute/prog button to enter the menu. SET AREA CODE - - shows on the display. 3. Use the touch-tone pad to enter your 3-digit area code. 4. Press the mute/prog button to confirm. You will hear a confirmation tone and the new area code shows on the display. NOTE: To restore the default setting to - - -, press and release del when "SET AREA CODE" shows on the display. CID Dialing a CID Number While reviewing CID records, you may dial the phone number showing on the display. 1. Make sure the phone is OFF (not in talk mode). 2. Press the cid/vol or buttons until the desired CID record shows on the display. 3. If the number does not dial as shown, press the format/conference button. Repeat if necessary, until the correct number of digits show on the display. 63
-
 1
1 -
2
-
3
-
4
-
5
-
6
-
7
-
8
-
9
-
10
-
11
-
12
-
13
-
14
-
15
-
16
-
17
-
18
-
19
-
20
-
21
-
22
-
23
-
24
-
25
-
26
-
27
-
28
-
29
-
30
-
31
-
32
-
33
-
34
-
35
-
36
-
37
-
38
-
39
-
40
-
41
-
42
-
43
-
44
-
45
-
46
-
47
-
48
-
49
-
50
-
51
-
52
-
53
-
54
-
55
-
56
-
57
-
 58
58 -
 59
59 -
 60
60 -
 61
61 -
 62
62 -
 63
63 -
 64
64 -
 65
65 -
 66
66 -
 67
67 -
 68
68 -
69
-
70
-
71
-
72
-
73
-
74
-
75
-
76
-
77
-
78
-
79
-
80
-
81
-
82
-
83
-
84
-
85
-
86
-
87
-
88
-
89
-
90
-
91
-
92
-
93
-
94
-
95
-
96
-
97
-
98
-
99
-
100
-
101
-
102
-
103
-
104
-
105
-
106
-
107
-
108
-
109
-
110
-
111
-
112
-
113
-
114
-
115
-
116
-
117
-
118
-
119
-
120
-
121
-
122
-
123
-
124
-
125
-
126
-
127
-
128
-
129
-
130
-
131
-
132
-
133
-
134
-
135
-
136
-
137
-
138
-
139
-
140
-
141
-
142
-
143
-
144
-
145
-
146
-
147
-
148
-
149
-
150
-
151
-
152
 |
 |
