GE 29586GE1 User Guide - Page 10
Wall Mounting the Phone
 |
View all GE 29586GE1 manuals
Add to My Manuals
Save this manual to your list of manuals |
Page 10 highlights
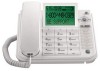
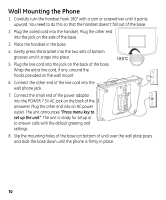
Wall Mounting the Phone 1. Carefully turn the handset hook 180° with a coin or screwdriver until it points upward. You need to do this so that the handset doesn't fall out of the base. 2. Plug the coiled cord into the handset. Plug the other end into the jack on the side of the base. 3. Place the handset in the base. 4. Gently press the bracket into the two sets of bottom grooves until it snaps into place. 5. Plug the line cord into the jack on the back of the base. Wrap the extra line cord, if any, around the hooks provided on the wall mount. 6. Connect the other end of the line cord into the wall phone jack. 7. Connect the small end of the power adaptor into the POWER 7.5V AC jack on the back of the answerer. Plug the other end into an AC power outlet. The unit announces "Press menu key to set up the unit". The unit is ready for setup or to answer calls with the default greeting and settings. 8. Slip the mounting holes of the base (on bottom of unit) over the wall plate posts and slide the base down until the phone is firmly in place. 10
-
 1
1 -
2
-
3
-
4
-
 5
5 -
 6
6 -
 7
7 -
 8
8 -
 9
9 -
 10
10 -
 11
11 -
 12
12 -
 13
13 -
 14
14 -
 15
15 -
16
-
17
-
18
-
19
-
20
-
21
-
22
-
23
-
24
-
25
-
26
-
27
-
28
-
29
-
30
-
31
-
32
-
33
-
34
-
35
-
36
-
37
-
38
-
39
-
40
-
41
-
42
-
43
-
44
 |
 |
