GE 29586GE1 User Guide - Page 11
Answering System Setup - review
 |
View all GE 29586GE1 manuals
Add to My Manuals
Save this manual to your list of manuals |
Page 11 highlights
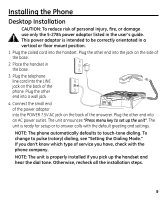
Important Instructions for Moving the Answerer: To move the answerer to a different location in the house, follow these instructions: 1. Disconnect the phone line. 2. Go to the electrical outlet and unplug the power adaptor. 3. Move the unit and phone line to the desired location. 4. Plug in the power adaptor into an electrical outlet. 5. The display shows that the messages have not been erased. 6. Connect the phone line. 7. Reset the time/date settings or wait for the next call to set them automatically. Answering System Setup Recording the Outgoing Announcement Before using your new answerer, you should record a greeting (the announcement callers hear when your answering system answers a call). If you don't record a greeting, callers hear a default greeting which says, "We are not available to take your call. Please leave a message. Thank you for calling." When recording the greeting you should be about 6 inches from the unit. Eliminate as much background noise as possible. 1. Prepare your greeting. Sample Greeting: "Hi, this is (use your name here). I can't answer the phone right now, so please leave your name, number, and a brief message after the tone, and I'll get back to you. Thanks for calling." 2. Hold down the ANNOUNCE button. The unit announces "Record announcement after the tone," and the screen displays TO RECORD. After the tone, you have 30 seconds to record your greeting. 3. Release ANNOUNCE when you finish. • To review the greeting, press and release ANNOUNCE. The unit plays back your greeting automatically. 11
-
 1
1 -
2
-
3
-
4
-
5
-
 6
6 -
 7
7 -
 8
8 -
 9
9 -
 10
10 -
 11
11 -
 12
12 -
 13
13 -
 14
14 -
 15
15 -
 16
16 -
17
-
18
-
19
-
20
-
21
-
22
-
23
-
24
-
25
-
26
-
27
-
28
-
29
-
30
-
31
-
32
-
33
-
34
-
35
-
36
-
37
-
38
-
39
-
40
-
41
-
42
-
43
-
44
 |
 |