GE CSHS5UGXSS Use and Care Manual - Page 23
Put The Refrigerator, In Place, Level The Doors, Screw Down Support Leg, Wrench, Turn The Door
 |
UPC - 084691176671
View all GE CSHS5UGXSS manuals
Add to My Manuals
Save this manual to your list of manuals |
Page 23 highlights
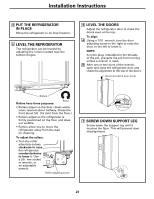
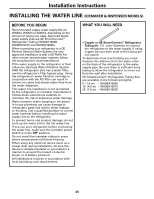
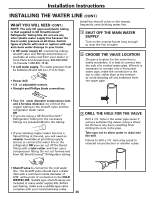
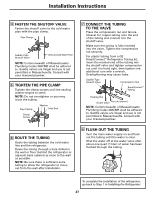
Installation Instructions 4 PUT THE REFRIGERATOR IN PLACE Move the refrigerator to its final location. 5 LEVEL THE REFRIGERATOR The refrigerator can be leveled by adjusting the rollers located near the bottom hinges. 6 LEVEL THE DOORS Adjust the refrigerator door to make the doors even at the top. To align: A Using a 7/16″ wrench, turn the door adjusting screw to the right to raise the door, to the left to lower it. NOTE: A nylon plug, imbedded in the threads of the pin, prevents the pin from turning unless a wrench is used. B After one or two turns of the wrench, open and close the refrigerator door and check the alignment at the top of the doors. Doors should be even at top Rollers Rollers have three purposes: Raise • Rollers adjust so the door closes easily when opened about halfway. (Raise the front about 5/8″ [16 mm] from the floor.) • Rollers adjust so the refrigerator is firmly positioned on the floor and does not wobble. • Rollers allow you to move the refrigerator away from the wall for cleaning. To adjust the rollers: • Turn the roller adjusting screws clockwise to raise the refrigerator, counterclockwise to lower it. Use a 3/8″ hex socket or wrench, or an adjustable wrench. Roller adjusting screw Raise 7/16″ wrench 7 SCREW DOWN SUPPORT LEG Screw down the support leg until it touches the floor. This will prevent door misalignment. 23
-
 1
1 -
2
-
3
-
4
-
5
-
6
-
7
-
8
-
9
-
10
-
11
-
12
-
13
-
14
-
15
-
16
-
17
-
 18
18 -
 19
19 -
 20
20 -
 21
21 -
 22
22 -
 23
23 -
 24
24 -
 25
25 -
 26
26 -
 27
27 -
 28
28 -
29
-
30
-
31
-
32
-
33
-
34
-
35
-
36
-
37
-
38
-
39
-
40
-
41
-
42
-
43
-
44
-
45
-
46
-
47
-
48
-
49
-
50
-
51
-
52
-
53
-
54
-
55
-
56
-
57
-
58
-
59
-
60
-
61
-
62
-
63
-
64
-
65
-
66
-
67
-
68
-
69
-
70
-
71
-
72
-
73
-
74
-
75
-
76
-
77
-
78
-
79
-
80
-
81
-
82
-
83
-
84
-
85
-
86
-
87
-
88
-
89
-
90
-
91
-
92
-
93
-
94
-
95
-
96
-
97
-
98
-
99
-
100
-
101
-
102
-
103
-
104
-
105
-
106
-
107
-
108
-
109
-
110
-
111
-
112
 |
 |
