GE CSHS5UGXSS Use and Care Manual - Page 8
Consumer Support, Troubleshooting Tips, Safety Instructions, Installation Instructions
 |
UPC - 084691176671
View all GE CSHS5UGXSS manuals
Add to My Manuals
Save this manual to your list of manuals |
Page 8 highlights
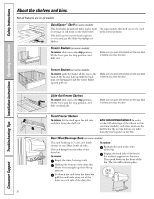
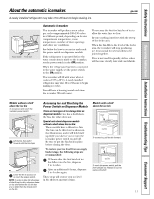
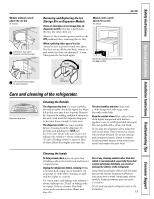
Consumer Support Troubleshooting Tips Installation Instructions Operating Instructions Safety Instructions About the shelves and bins. Not all features are on all models. QuickSpace™ Shelf (on some models) This shelf splits in half and slides under itself for storage of tall items on the shelf below. This shelf can be removed and replaced or relocated just like Slide-Out Spillproof Shelves. On some models, this shelf can not be used in the lowest position. Freezer Baskets (on some models) To remove, slide out to the stop position, lift the front past the stop position, and slide out. Make sure you push the baskets all the way back in before you close the door. Freezer Baskets (on some models) To remove, push the basket all the way to the back of the freezer. Lift up until the back pins are disengaged. Lift the entire basket up and pull out. Make sure you push the baskets all the way back in before you close the door. Slide-Out Freezer Shelves To remove, slide out to the stop position, lift the front past the stop position, and slide out from rib. Make sure you push the shelves all the way back in before you close the door. Fixed Freezer Shelves To remove, lift the shelf up at the left side and then bring the shelf out. NOTE FOR DISPENSER MODELS: In order to take full advantage of the tilt-out ice bin (on some models), only store items on the shelf below the ice bin that are no taller than the lowest point on the bin. Door Wine/Beverage Rack (on some models) This rack holds up to 5 cans, one bottle of wine or one 2-liter bottle of soda. The rack hangs from the sides of the dairy bin. To remove: Empty the wine/beverage rack. Holding the bottom of the dairy bin, lift the front straight up, then lift up and out. To replace: Reattach the rack to the sides of the bin. Engage the back side of the bin in the molded supports on the door. Then push down on the front of the bin. The bin will lock into place. To detach the rack from the dairy bin, pull the rack's side wires out of the holes on each side of the dairy bin. 8
-
 1
1 -
2
-
 3
3 -
 4
4 -
 5
5 -
 6
6 -
 7
7 -
 8
8 -
 9
9 -
 10
10 -
 11
11 -
 12
12 -
 13
13 -
14
-
15
-
16
-
17
-
18
-
19
-
20
-
21
-
22
-
23
-
24
-
25
-
26
-
27
-
28
-
29
-
30
-
31
-
32
-
33
-
34
-
35
-
36
-
37
-
38
-
39
-
40
-
41
-
42
-
43
-
44
-
45
-
46
-
47
-
48
-
49
-
50
-
51
-
52
-
53
-
54
-
55
-
56
-
57
-
58
-
59
-
60
-
61
-
62
-
63
-
64
-
65
-
66
-
67
-
68
-
69
-
70
-
71
-
72
-
73
-
74
-
75
-
76
-
77
-
78
-
79
-
80
-
81
-
82
-
83
-
84
-
85
-
86
-
87
-
88
-
89
-
90
-
91
-
92
-
93
-
94
-
95
-
96
-
97
-
98
-
99
-
100
-
101
-
102
-
103
-
104
-
105
-
106
-
107
-
108
-
109
-
110
-
111
-
112
 |
 |
