GE CYE22USHSS Use and Care Manual - Page 23
Installation, Refrigerator, Instructions - warranty
 |
View all GE CYE22USHSS manuals
Add to My Manuals
Save this manual to your list of manuals |
Page 23 highlights
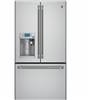
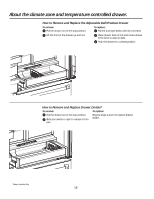
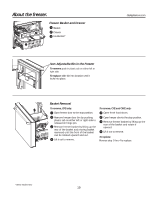
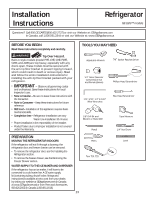
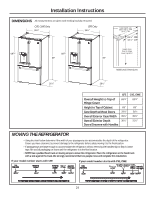
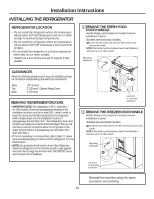
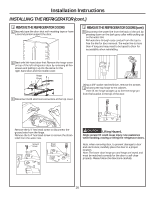
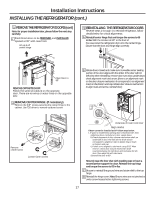
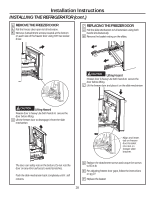
Installation Instructions Refrigerator GE Café™ models Questions? Call 800.GE.CARES (800.432.2737) or visit our Website at: GEAppliances.com In Canada, call 1.800.561.3344 or visit our Website at: www.GEAppliances.ca BEFORE YOU BEGIN Read these instructions completely and carefully. WARNING Tip Over Hazard. Built-in style models (model PYE, CYE, GYE, PWE, CWE, and ZWE) are top heavy, especially with any doors open. These models must be secured with the anti-tip floor bracket to prevent tipping forward, which could result in death or serious injury. Read and follow the entire installation instructions for installing the anti-tip floor bracket packed with your refrigerator. • IMPORTANT ³ Observe all governing codes and ordinances. Save these instructions for local inspector's use. • Note to Installer - Be sure to leave these instructions with the Consumer. • Note to Consumer - Keep these instructions for future reference. • Skill level - Installation of this appliance requires basic mechanical skills. • Completion time - Refrigerator Installation can vary Water Line Installation 30 minutes • Proper installation is the responsibility of the installer. • Product failure due to improper installation is not covered under the Warranty. TOOLS YOU MAY NEED Adjustable Wrench Ȓµ Socket Ratchet/Driver 1/4" Outer Diameter Compression Nut and Ferrule (sleeve) Phillips-Head Screwdriver 1/8", 3/32", 1/4" & 5/32" Allen Wrenches Flat-Head Screwdriver 1/8" Drill Bit and Electric or Hand Drill Pencil Tape Measure 1/4" Nut Driver PREPARATION MOVING THE REFRIGERATOR INDOORS Pliers Level If the refrigerator will not fit through a doorway, the refrigerator door and freezer drawer can be removed. • To remove the refrigerator door, see the Installing the Refrigerator section. • To remove the freezer drawer, see the Removing the Freezer Drawer section. Torx T20, T25 WATER SUPPLY TO THE ICE MAKER AND DISPENSER If the refrigerator has an ice maker, it will have to be connected to a cold water line. A GE water supply kit (containing tubing, shutoff valve, fittings and instructions) is available at extra cost from your dealer, by visiting our website at GEAppliances.com (in Canada at www.GEAppliances.ca) or from Parts and Accessories, 800.626.2002 (in Canada 1.800.661.1616). 23
-
 1
1 -
2
-
3
-
4
-
5
-
6
-
7
-
8
-
9
-
10
-
11
-
12
-
13
-
14
-
15
-
16
-
17
-
 18
18 -
 19
19 -
 20
20 -
 21
21 -
 22
22 -
 23
23 -
 24
24 -
 25
25 -
 26
26 -
 27
27 -
 28
28 -
29
-
30
-
31
-
32
-
33
-
34
-
35
-
36
-
37
-
38
-
39
-
40
-
41
-
42
-
43
-
44
-
45
-
46
-
47
-
48
-
49
-
50
-
51
-
52
-
53
-
54
-
55
-
56
-
57
-
58
-
59
-
60
-
61
-
62
-
63
-
64
-
65
-
66
-
67
-
68
-
69
-
70
-
71
-
72
-
73
-
74
-
75
-
76
-
77
-
78
-
79
-
80
-
81
-
82
-
83
-
84
-
85
-
86
-
87
-
88
-
89
-
90
-
91
-
92
-
93
-
94
-
95
-
96
-
97
-
98
-
99
-
100
-
101
-
102
-
103
-
104
-
105
-
106
-
107
-
108
-
109
-
110
-
111
-
112
-
113
-
114
-
115
-
116
-
117
-
118
-
119
-
120
-
121
-
122
-
123
-
124
-
125
-
126
-
127
-
128
-
129
-
130
-
131
-
132
-
133
-
134
-
135
-
136
-
137
-
138
-
139
-
140
-
141
-
142
-
143
-
144
 |
 |