GE GDSS0KCXSS Installation Instructions - Page 1
GE GDSS0KCXSS - 20.2 cu. Ft. Bottom-Freezer Drawer Refrigerator Manual
 |
UPC - 084691171461
View all GE GDSS0KCXSS manuals
Add to My Manuals
Save this manual to your list of manuals |
Page 1 highlights
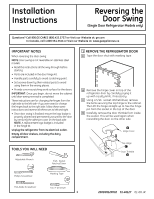
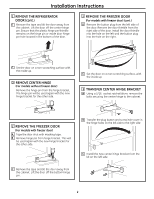
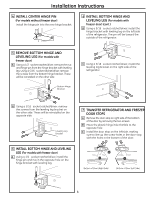
Installation Instructions Reversing the Door Swing (Single Door Refrigerator Models only) Questions? Call 800.GE.CARES (800.432.2737) or Visit our Website at: ge.com In Canada, call 1.800.561.3344 or Visit our Website at: www.geappliances.ca IMPORTANT NOTES When reversing the door swing: NOTE: Door swing is not reversible on stainless steel models. • Read the instructions all the way through before starting. • Parts are included in the door hinge kit. • Handle parts carefully to avoid scratching paint. • Set screws down by their related parts to avoid using them in the wrong places. • Provide a non-scratching work surface for the doors. IMPORTANT: Once you begin, do not move the cabinet until door-swing reversal is completed. These instructions are for changing the hinges from the right side to the left side-if you ever want to change the hinges back to the right side, follow these same instructions and reverse all references to left and right. • Once door swing is finalized, ensure the logo badge is properly aligned and permanently secured to the door by removing the adhesive cover on the back side. NOTE: A replacement logo badge is included in the hinge kit. Unplug the refrigerator from its electrical outlet. Empty all door shelves, including the dairy compartment. TOOLS YOU WILL NEED Adjustable Wrench 5/16″ Socket Ratchet/Driver 1 REMOVE THE REFRIGERATOR DOOR A Tape the door shut with masking tape. B Remove the hinge cover on top of the refrigerator door by carefully prying it up with a putty knife, if necessary. C Using a 5/16″ socket ratchet/driver, remove the bolts securing the top hinge to the cabinet. Then lift the hinge straight up to free the hinge pin from the socket in the top of the door. D Carefully remove the door thimble from inside the socket. This will be used again when reinstalling the door on the other side. Hinge Cover Top Hinge Door Thimble Phillips Screwdriver Masking Tape Thin-blade Screwdriver Torx T-20 Driver 1 200D9512P002 31-46127 01-08 JR
-
 1
1 -
 2
2 -
 3
3 -
 4
4
 |
 |