GE GSL25JFXLB Use and Care Manual - Page 5
About the crispers and pans., Consumer Support, Troubleshooting Tips, Safety Instructions - model
 |
UPC - 084691177968
View all GE GSL25JFXLB manuals
Add to My Manuals
Save this manual to your list of manuals |
Page 5 highlights
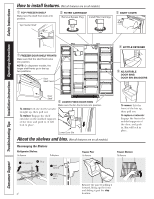
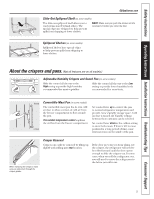
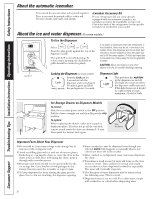
Safety Instructions Operating Instructions Installation Instructions Troubleshooting Tips Consumer Support GEAppliances.com Slide-Out Spillproof Shelf (on some models) The slide-out spillproof shelf allows you to reach items stored behind others. The special edges are designed to help prevent spills from dripping to lower shelves. NOTE: Make sure you push the shelves all the way back in before you close the door. Spillproof Shelves (on some models) Spillproof shelves have special edges to help prevent spills from dripping to lower shelves. About the crispers and pans. (Not all features are on all models.) Adjustable Humidity Crispers and Snack Pan (on some models) HIGH LOW Slide the control all the way to the Slide the control all the way to the Low High setting to provide high humidity setting to provide lower humidity levels recommended for most vegetables. recommended for most fruits. HIGH LOW Normal Coldest Convertible Meat Pan (on some models) The convertible meat pan has its own cold air duct to allow a stream of cold air from the freezer compartment to flow around the pan. The variable temperature control regulates the air flow from the freezer compartment. Set control lever up to convert the pan to normal refrigerator temperature and provide extra vegetable storage space. Cold air duct is turned off. Variable settings between these extremes can be selected. Set control lever down to the coldest setting to store fresh meats. If lever is left in meat position for a long period of time, some frost may form on the inside of the pan. When replacing the crispers, make sure you slide them through the crisper guides. Crisper Removal Crispers can easily be removed by tilting up slightly and pulling past stop location. If the door prevents you from taking out the crispers, the refrigerator will need to be rolled forward until the door opens enough to slide the crispers out. In some cases, when you roll the refrigerator out, you will need to move the refrigerator to the left as you roll it out. 5
-
 1
1 -
 2
2 -
 3
3 -
 4
4 -
 5
5 -
 6
6 -
 7
7 -
 8
8 -
 9
9 -
 10
10 -
 11
11 -
12
-
13
-
14
-
15
-
16
-
17
-
18
-
19
-
20
-
21
-
22
-
23
-
24
-
25
-
26
-
27
-
28
-
29
-
30
-
31
-
32
-
33
-
34
-
35
-
36
-
37
-
38
-
39
-
40
-
41
-
42
-
43
-
44
-
45
-
46
-
47
-
48
-
49
-
50
-
51
-
52
-
53
-
54
-
55
-
56
-
57
-
58
-
59
-
60
-
61
-
62
-
63
-
64
 |
 |
