GE GSS20DBTWW Owners Manual - Page 10
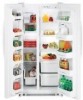
Ice and Water Dispenser
 |
View all GE GSS20DBTWW manuals
Add to My Manuals
Save this manual to your list of manuals |
Page 10 highlights
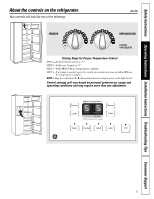
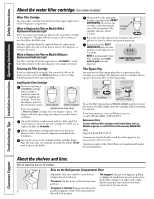
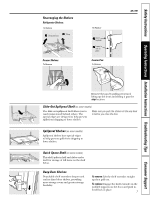
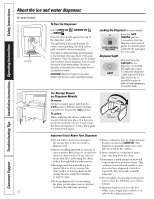
Troubleshooting Tips Installation Instructions Operating Instructions Safety Instructions About the ice and water dispenser. On some models Spill Shelf To Use the Dispenser Select CUBED ICE , CRUSHED ICE or WATER . Press the glass gently against the top of the dispenser cradle. The spill shelf is not self-draining. To reduce water spotting, the shelf and its grille should be cleaned regularly. If no water is dispensed when the refrigerator is first installed, there may be air in the water line system. Press the dispenser arm for at least two minutes to remove trapped air from the water line and to fill the water system. To flush out impurities in the water line, throw away the first six glassfuls of water. CAUTION: Never put fingers or any other objects into the ice crusher discharge opening. Locking the Dispenser (on some models) Press the LOCK CONTROL pad for 3 seconds to lock the dispenser and control panel. To unlock, press and hold the pad again for 3 seconds. Dispenser Light This pad turns the night light in the dispenser on and off. The light also comes on when the dispenser cradle is pressed. If this light burns out, it should be replaced with a 6 watt maximum, 12 volt DC bulb. Ice Storage Drawer on Dispenser Models To remove: Set the icemaker power switch to the O (off) position. Pull the drawer straight out and then lift past the stop position. To replace: When replacing the drawer, make sure to push it firmly into place. If it does not go all the way back, remove it and rotate the drive mechanism 1/4 turn. Then push the drawer back again. Rotate Drive Mechanism Consumer Support Important Facts About Your Dispenser s Do not add ice from trays or bags to s Some crushed ice may be dispensed even the storage bin. It may not crush or though you selected CUBED ICE. This dispense well. happens occasionally when a few cubes s Avoid overfilling glass with ice and use of have been left in the crusher. narrow glasses. Backed-up ice can jam the s After crushed ice is dispensed, some chute or cause the door in the chute to water may drip from the chute. freeze shut. If ice is blocking the chute, poke it through with a wooden spoon. s Sometimes a small mound of snow will form on the door in the ice chute. This s Beverages and foods should not be condition is normal and usually occurs quick-chilled in the ice storage bin. when you have dispensed crushed ice Cans, bottles or food packages in the repeatedly. The snow will eventually storage bin may cause the icemaker evaporate. or auger to jam. s The first glass of water dispensed may be s To keep dispensed ice from missing warmer than the following ones. This is the glass, put the glass close to, but not normal. touching, the dispenser opening. s Dispensed water is not ice cold. For 10 colder water, simply add crushed ice or cubes before dispensing water.
-
 1
1 -
2
-
3
-
4
-
 5
5 -
 6
6 -
 7
7 -
 8
8 -
 9
9 -
 10
10 -
 11
11 -
 12
12 -
 13
13 -
 14
14 -
 15
15 -
16
-
17
-
18
-
19
-
20
-
21
-
22
-
23
-
24
-
25
-
26
-
27
-
28
-
29
-
30
-
31
-
32
-
33
-
34
-
35
-
36
-
37
-
38
-
39
-
40
-
41
-
42
-
43
-
44
-
45
-
46
-
47
-
48
-
49
-
50
-
51
-
52
-
53
-
54
-
55
-
56
-
57
-
58
-
59
-
60
-
61
-
62
-
63
-
64
-
65
-
66
-
67
-
68
-
69
-
70
-
71
-
72
-
73
-
74
-
75
-
76
-
77
-
78
-
79
-
80
-
81
-
82
-
83
-
84
-
85
-
86
-
87
-
88
 |
 |
