GE GSS20DBTWW Owners Manual - Page 5
About the controls on the refrigerator., Consumer Support, Troubleshooting Tips, Safety Instructions - lighting
 |
View all GE GSS20DBTWW manuals
Add to My Manuals
Save this manual to your list of manuals |
Page 5 highlights
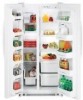
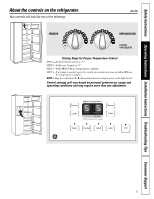
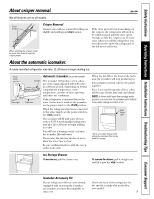
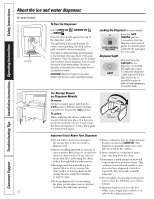
Safety Instructions Operating Instructions Installation Instructions Troubleshooting Tips Consumer Support 89 89 About the controls on the refrigerator. Your controls will look like one of the following: 012 12 34 5 67 FREEZER 34 5 67 FRESH FOOD 9 IS COLDEST 0 IS OFF ge.com Startup Steps for Proper Temperature Control STEP 1-Set Fresh Food Control on "5." STEP 2-Set Freezer Control on "5." STEP 3-WAIT 12 HOURS for temperature to stabilize. STEP 4-If a change is needed, move the control one number at a time and allow 12 hours for temperature to stabilize. NOTE: Setting the controls to the 0 (off) position does not remove power to the light circuit. Control settings will vary based on personal preferences, usage and operating conditions and may require more than one adjustment. 5
-
 1
1 -
 2
2 -
 3
3 -
 4
4 -
 5
5 -
 6
6 -
 7
7 -
 8
8 -
 9
9 -
 10
10 -
 11
11 -
12
-
13
-
14
-
15
-
16
-
17
-
18
-
19
-
20
-
21
-
22
-
23
-
24
-
25
-
26
-
27
-
28
-
29
-
30
-
31
-
32
-
33
-
34
-
35
-
36
-
37
-
38
-
39
-
40
-
41
-
42
-
43
-
44
-
45
-
46
-
47
-
48
-
49
-
50
-
51
-
52
-
53
-
54
-
55
-
56
-
57
-
58
-
59
-
60
-
61
-
62
-
63
-
64
-
65
-
66
-
67
-
68
-
69
-
70
-
71
-
72
-
73
-
74
-
75
-
76
-
77
-
78
-
79
-
80
-
81
-
82
-
83
-
84
-
85
-
86
-
87
-
88
 |
 |
