GE GTS18JBPWW Use and Care Manual - Page 9
Replacing the Light Bulbs
 |
UPC - 084691078142
View all GE GTS18JBPWW manuals
Add to My Manuals
Save this manual to your list of manuals |
Page 9 highlights
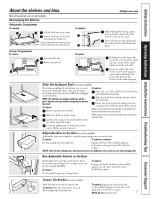
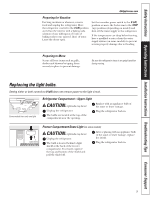
Safety Instructions Operating Instructions Installation Instructions Troubleshooting Tips Consumer Support GEAppliances.com Preparing for Vacation For long vacations or absences, remove food and unplug the refrigerator. Move the refrigerator control to the 0 (off) position and clean the interior with a baking soda solution of one tablespoon (15 ml) of baking soda to one quart (1 liter) of water. Leave the doors open. Set the icemaker power switch to the O (off) position or move the feeler arm to the STOP (up) position (depending on model) and shut off the water supply to the refrigerator. If the temperature can drop below freezing, have a qualified servicer drain the water supply system (on some models) to prevent serious property damage due to flooding. Preparing to Move Secure all loose items such as grille, shelves and drawers by taping them securely in place to prevent damage. Be sure the refrigerator stays in an upright position during moving. Replacing the light bulbs. Setting either or both controls to 0 (off) does not remove power to the light circuit. Some models have only one light. Refrigerator Compartment-Upper Light CAUTION: Light bulbs may be hot. Unplug the refrigerator. The bulbs are located at the top of the compartment near the opening. Replace with an appliance bulb of the same or lower wattage. Plug the refrigerator back in. Light shield Freezer Compartment Dome Light (on some models) CAUTION: Light bulbs may be hot. Unplug the refrigerator. The bulb is located behind a light shield at the back of the freezer compartment. To remove, squeeze the top and bottom of the shield and pull the shield off. After replacing with an appliance bulb of the same or lower wattage, replace the shield. Plug the refrigerator back in. 9
-
 1
1 -
2
-
3
-
 4
4 -
 5
5 -
 6
6 -
 7
7 -
 8
8 -
 9
9 -
 10
10 -
 11
11 -
 12
12 -
 13
13 -
 14
14 -
15
-
16
-
17
-
18
-
19
-
20
-
21
-
22
-
23
-
24
-
25
-
26
-
27
-
28
-
29
-
30
-
31
-
32
-
33
-
34
-
35
-
36
-
37
-
38
-
39
-
40
-
41
-
42
-
43
-
44
-
45
-
46
-
47
-
48
-
49
-
50
-
51
-
52
-
53
-
54
-
55
-
56
-
57
-
58
-
59
-
60
-
61
-
62
-
63
-
64
-
65
-
66
-
67
-
68
-
69
-
70
-
71
-
72
-
73
-
74
-
75
-
76
-
77
-
78
-
79
-
80
 |
 |