GE GTW220ACKWW Installation Instructions - Page 17
Connect To Drain, Connect To Drain Continued
 |
View all GE GTW220ACKWW manuals
Add to My Manuals
Save this manual to your list of manuals |
Page 17 highlights
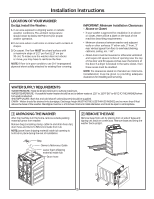
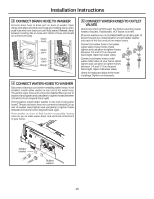
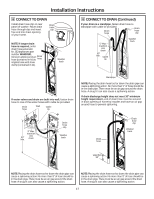
Installation Instructions 6 CONNECT TO DRAIN Install drain hose clip on rear panel of washer. Route drain hose through clip and insert free end into drain opening of your home. Drain hose clip NOTE: If longer drain hose is required, order drain hose extension kit, GE Appliances part number WH49X301. Connect additional drain Drain hose (contained in kit) to hose original hose with hose clamp (contained in kit). Washer back 6 CONNECT TO DRAIN (Continued) If your drain is a standpipe, fasten drain hose to standpipe with cable tie provided. Drain Drain hose hose clip 5" Max. insertion into drain 30" Min. Cable tie Washer back If water valves and drain are built into wall, fasten drain hose to one of the water hoses with cable tie provided. Drain hose Wall Cable tie Standpipe NOTE: Placing the drain hose too far down the drain pipe can cause a siphoning action. No more than 5" of hose should be in the drain pipe. There must be an air gap around the drain hose. A snug fit can also cause a siphoning action. If drain discharge height does not meet 30" minimum height requirement, end of drain hose must be secured in drain opening of home by installer and have an air gap around hose to prevent siphoning. 5" Max. insertion 30" Min. into drain Drain hose clip Washer back Drain hose Drain hose clip Washer back Less than 30" NOTE: Placing the drain hose too far down the drain pipe can cause a siphoning action. No more than 5" of hose should be in the drain pipe. There must be an air gap around the drain hose. A snug fit can also cause a siphoning action. NOTE: Placing the drain hose too far down the drain pipe can cause a siphoning action. No more than 5" of hose should be in the drain pipe. There must be an air gap around the drain hose. A snug fit can also cause a siphoning action. 17
-
 1
1 -
2
-
3
-
4
-
5
-
6
-
7
-
8
-
9
-
10
-
11
-
 12
12 -
 13
13 -
 14
14 -
 15
15 -
 16
16 -
 17
17 -
 18
18 -
 19
19 -
 20
20 -
 21
21 -
 22
22 -
23
-
24
-
25
-
26
-
27
-
28
-
29
-
30
-
31
-
32
-
33
-
34
-
35
-
36
-
37
-
38
-
39
-
40
-
41
-
42
-
43
-
44
-
45
-
46
-
47
-
48
-
49
-
50
-
51
-
52
-
53
-
54
-
55
-
56
-
57
-
58
-
59
-
60
-
61
-
62
-
63
-
64
-
65
-
66
-
67
-
68
-
69
-
70
-
71
-
72
-
73
-
74
-
75
-
76
-
77
-
78
-
79
-
80
 |
 |
