GE JGP975SEKSS Installation Instructions - Page 10
Installation Instructions, COOKTOP BURNERS
 |
UPC - 084691114529
View all GE JGP975SEKSS manuals
Add to My Manuals
Save this manual to your list of manuals |
Page 10 highlights
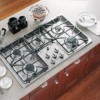
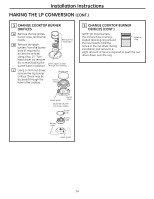
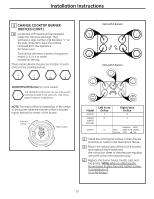
Installation Instructions Cooktop Burners 1 Assembling the Cooktop Burners The electrode of the spark igniter is exposed. Be careful not to push any cooktop controls while the top of the burner is removed. Do not remove the top or touch the electrode of any burner while another burner is turned on. Electrical shock might result. A Replace the burner head onto the burner base, making sure that the head is properly oriented over the burner base and the electrode. Make sure to place the correct burner head on the correct burner base and that the burner head sits level on the burner base. The burner heads are not interchangeable. B Place the burner caps on the burner heads, making sure to place the correct burner cap on the correct burner head. The burner caps are not interchangeable. Make sure that the burner caps are properly seated on the burner heads. Burner cap properly seated Burner cap not properly seated C Make sure the pins in the burner heads match the burner base indentations and that they are properly seated in them by rotating the heads until they are level. Burner cap Burner head Locator pins Electrode Make sure the slot in Pin indentations the burner head is positioned over the Burner cap electrode. The burner cap has three to four Burner head pins. When Stability replacing the chamber cap, make sure none of the pins sits in the stability chamber. Burner base Burner base Electrode Make sure the hole Burner cap in the burner head assembly is positioned over the electrode and Burner head that the burner head is assembly fully inserted inside the burner base. A small gap between the base and head is normal. Electrode Burner base 10
-
 1
1 -
2
-
3
-
4
-
 5
5 -
 6
6 -
 7
7 -
 8
8 -
 9
9 -
 10
10 -
 11
11 -
 12
12 -
 13
13 -
 14
14 -
 15
15 -
16
-
17
-
18
-
19
-
20
-
21
-
22
-
23
-
24
-
25
-
26
-
27
-
28
-
29
-
30
-
31
-
32
 |
 |
