GE JP3530SJSS Installation Instructions - Page 4
Installation Instructions, PREPARING THE OPENING
 |
View all GE JP3530SJSS manuals
Add to My Manuals
Save this manual to your list of manuals |
Page 4 highlights
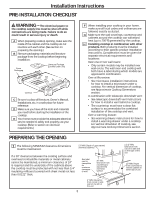
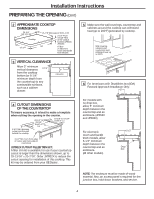
Installation Instructions PREPARING THE OPENING (Cont) 2 APPROXIMATE COOKTOP DIMENSIONS 29-3/4" (29-7/8" SS) Cooktop 19-1/4" 21-7/8" (Monogram SS 21-1/2") 3-1/4" Front 4-3/16" Rear at the conduit location (JP3530, JP3030) 28" 6" Rear on Electronic Touch and Backlit Knob Models 3 VERTICAL CLEARANCE Allow 5" minimum 8-1/4" vertical clearance from the cooktop bottom (or 8-1/4" minimum depth from the countertop) to any combustible surfaces, such as a cabinet drawer. 5" DRAWER 5 Make sure the wall coverings, countertop and cabinets around the cooktop can withstand heat (up to 200°F) generated by cooktop. Wall covering, cabinets and countertop must withstand heat up to 200°F. 6 For Americans with Disabilities Act (ADA) Forward Approach Installation Only: 5" 4 CUTOUT DIMENSIONS OF THE COUNTERTOP To insure accuracy, it is best to make a template when cutting the opening in the counter. 28-1/2" to 28-5/8" length of cut 19-5/8" to 19-3/4" width of cut 1-3/4" Min. Between cutout and the wall behind the cooktop 2-1/2" Min. from front edge of cutout and front edge of countertop JXTR32X CUTOUT FILLER TRIM KIT: A filler trim kit is available for use if your countertop cutout is larger than the dimensions shown, up to 29-13/16" x 20-7/16". Order JXTR32X to reduce the cutout opening for installation of this cooktop. This kit may be ordered from your GE Dealer. For models with no drop box, allow 5" minimum depth between the countertop and an enclosure. (JP3530 and JP3030) For electronic touch and backlit knob models, allow 6-1/2" minimum depth between the countertop and an enclosure. (All other models) 6 1/2" Drop box NOTE: The enclosure must be made of wood material. Also, an access panel is required for the junction box, hold-down brackets, and service. 4
-
 1
1 -
 2
2 -
 3
3 -
 4
4 -
 5
5 -
 6
6 -
 7
7 -
 8
8 -
 9
9 -
 10
10 -
11
-
12
-
13
-
14
-
15
-
16
 |
 |
