GE JVM2052SNSS Use and Care Manual - Page 8
About the features of your oven., Features of the Oven - model
 |
UPC - 084691188094
View all GE JVM2052SNSS manuals
Add to My Manuals
Save this manual to your list of manuals |
Page 8 highlights
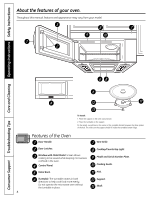
Consumer Support Troubleshooting Tips Care and Cleaning Operating Instructions Safety Instructions About the features of your oven. Throughout this manual, features and appearance may vary from your model. To Install: 1. Place the support on the oven cavity bottom. 2. Place the turntable on the support. Fit the raised, curved lines in the center of the turntable bottom between the three spokes of the hub. The rollers on the support should fit inside the turntable bottom ridge. Features of the Oven Door Handle. Vent Grille. Door Latches. Window with Metal Shield. Screen allows cooking to be viewed while keeping microwaves confined in the oven. Control Panel. Cooktop/Countertop Light. Model and Serial Number Plate. Cooking Guide. Metal Rack. Hub. Turntable. The turntable rotates in both directions to help cook food more evenly. Do not operate the microwave oven without the turntable in place. Support. Shaft. 8
-
 1
1 -
2
-
 3
3 -
 4
4 -
 5
5 -
 6
6 -
 7
7 -
 8
8 -
 9
9 -
 10
10 -
 11
11 -
 12
12 -
 13
13 -
14
-
15
-
16
-
17
-
18
-
19
-
20
-
21
-
22
-
23
-
24
-
25
-
26
-
27
-
28
-
29
-
30
-
31
-
32
-
33
-
34
-
35
-
36
-
37
-
38
-
39
-
40
 |
 |
