GE PCKS443EBWW User Manual
GE PCKS443EBWW Manual
 |
View all GE PCKS443EBWW manuals
Add to My Manuals
Save this manual to your list of manuals |
GE PCKS443EBWW manual content summary:
- GE PCKS443EBWW | User Manual - Page 1
Use andCare Guide With Installation Instructions Dryer Safety Instructions 3, 4 Installation Instructions Exhaust 5, 6 Electric Dryer 7 Operating Instructions, Tips Automatic Drying 10, 11 Drying Selection Guide 10 Knits Drying Tips 8, 10, 14 Lint Filter 12 Loading 9 Operating the Dryer 8, - GE PCKS443EBWW | User Manual - Page 2
have a warranty to protect you against manufacturing problems during the period of your dryer warranty. Camco Service Contracts are available to provide the same trouble-free service for as long as you own your appliance. Should your appliance require service after the warranty has expired, a Camco - GE PCKS443EBWW | User Manual - Page 3
electrical overload. - Exhausting to the outside is STRONGLY RECOMMENDED to prevent large amounts of moisture and lint from being blown into the room. Carefully follow the Exhausting Details in the Installation Instructions. Do not repair or replace any part of the appliance or attempt any servicing - GE PCKS443EBWW | User Manual - Page 4
to play inside, on, or with this appliance or any discarded appliance. Dispose of discarded appliances and shipping or packing materials properly. Before discarding a dryer, or removing from service, remove the door of the dryer compartment. SAVE THESE INSTRUCTIONS • Keep all laundry aids (such as - GE PCKS443EBWW | User Manual - Page 5
Installation Instructions Exhaust INSTALLATION INSTRUCTIONS EXHAUST Installation and service must be performed by a qualified installer, service agency or the gas supplier. IMPORTANT: Have your dryer installed properly. NOTE: The WARNING and IMPORTANT instructions appearing in this manual are not - GE PCKS443EBWW | User Manual - Page 6
EXHAUST LENGTH CALCULATION Table 1: RECOMMENDED MAXIMUM LENGTH ELECTRIC DRYERS Recommended Weather Hood Type Use only for short run installations No. of 90˚ elbows 0 1 2 3 Rigid 14 m (46 ft.) 11 m (38 ft.) 9 m (31 ft.) 7 m (24 ft.) * Do not use non metallic flexible duct. Metallic Flexible* - GE PCKS443EBWW | User Manual - Page 7
• The dryer must be attached to the floor following instructions available from the dealer. • Installation must comply with the current CAN/CSA Z240 MH series Mobile Home Installation Codes. Installation NOTE: CONSIDERATION MUST BE GIVEN TO INSTALLING AND SERVICING THE APPLIANCE. ELECTRICAL POWER - GE PCKS443EBWW | User Manual - Page 8
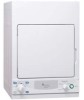
OPERATING YOUR DRYER WARNING - To reduce the risk of fire, electric shock, or injury to persons when using your appliance read the IMPORTANT SAFETY INSTRUCTIONS before operating this appliance. Features and appearances may vary 1 Drying Selections. Select the proper heat on the Fabric Care - GE PCKS443EBWW | User Manual - Page 9
on hangers after drying. HOW TO LOAD THE CLOTHES Don't overload your dryer. Crowded loads don't dry efficiently and clothes may be unnecessarily wrinkled. load like this. HOW TO SORT CLOTHES As a general rule, sort clothes by surface texture, fabric, colour and weight, as you would for - GE PCKS443EBWW | User Manual - Page 10
found on fabric care labels. For best results, follow your fabric care labels. (green) MAY BE DRIED IN A TUMBLE DRYER AT MEDIUM TO REGULAR SETTING. (yellow) MAY BE DRIED IN A TUMBLE DRYER AT LOW SETTING. SHOULD BE HUNG TO DRY. (green) SHOULD BE HUNG SOAKING WET TO DRIP DRY. (green) SHOULD - GE PCKS443EBWW | User Manual - Page 11
Automatic and Timed Drying Automatic Drying When using the Automatic Cycles, the Automatic Dry Control system continually senses the temperature of the air in the dryer drum. Wet laundry keeps this air cool. When laundry is dry enough (and the drum air warms enough) the heat turns off. When the air - GE PCKS443EBWW | User Manual - Page 12
Exterior Wipe off any spills or washing compounds. Wipe or dust with a damp cloth. Try not to strike the surface with sharp objects. Dryer control panel and finishes may be damaged by some laundry pre-treatment soil and stain remover products if such products are sprayed on or have - GE PCKS443EBWW | User Manual - Page 13
or Turn off electrical power. 2. Disconnect duct from dryer. 3. Clean exhaust duct from end where dryer is connected to DRYER Combustible lint may collect on the inside of the dryer cabinet. CLEAN EVERY 2 TO 3 YEARS OR MORE OFTEN DEPENDING ON USAGE. Cleaning should be done by a qualified service - GE PCKS443EBWW | User Manual - Page 14
. If flexible ducting is used, be sure it is not kinked and is properly installed according to the Installation Instructions. • Blown fuses or tripped circuit breakers. Check household fuses or circuit breakers. Most electric dryers use two. It is possible for one to be blown or tripped and the - GE PCKS443EBWW | User Manual - Page 15
NOTES 15 - GE PCKS443EBWW | User Manual - Page 16
Canada when the dryer has been properly installed according to the instructions supplied by Camco and is connected to an adequate and proper utility service installation. If you have an installation problem, contact your dealer or installer. You are responsible for providing adequate electrical, - GE PCKS443EBWW | User Manual - Page 17
Guide d'utilisation et d'entretien et directives d'installation Sécheuse Mesures de sécurit 3, 4 Directives d'installation Évacuation 5, 6 Sécheuse Évacuation de la sécheuse 13 Extérieur 12 Filtre à charpie 12 Guide de dépannage 14 Services à la clientèle Garantie 16 Numéros de modèle et de - GE PCKS443EBWW | User Manual - Page 18
d'appeler un réparateur, consultez le Guide de dépannage. Vous y trouverez éros dans toute correspondance ou appel de service concernant votre sécheuse. MISE EN GARDE appelez les pompiers. - L'installation et les réparations doivent . De plus, une garantie protège votre appareil contre tout vice de - GE PCKS443EBWW | User Manual - Page 19
l'usage auquel il est destiné, comme expliqué dans le présent Guide d'utilisation et d'entretien. Avant d'utiliser votre sécheuse, assurezvous qu'elle a été adéquatement installée, conformément aux Directives d'installation. - L'appareil doit être adéquatement mis à la terre, conformément à tous - GE PCKS443EBWW | User Manual - Page 20
MESURES DE SÉCURITÉ IMPORTANTES • Avant chaque séchage, nettoyez le filtre à charpie afin de prévenir l'accumulation de charpie à l'intérieur de la sécheuse ou dans la pièce. NE FAITES PAS FONCTIONNER LA SÉCHEUSE SANS LE FILTRE À CHARPIE. • Ne laissez pas s'accumuler autour de l'évent, et autour et - GE PCKS443EBWW | User Manual - Page 21
d'oiseaux ou d'autres animaux. • L'évent doit offrir le moins de résistance possible à l'évacuation de l'air et n'exiger que peu ou pas d'entretien. • L'évent doit être installé à au moins 300 mm (12 po) au-dessus du sol ou de tout obstacle, et son ouverture doit être dirigée vers le bas. • Si vous - GE PCKS443EBWW | User Manual - Page 22
coude de 90 degrés. • Sceller tous les raccords avec du ruban pour conduits. • Installer le panneau arrière. Débouchure de droite 295 mm (115/8 po) 115 mm la sécheuse. • Sceller tous les raccords avec du ruban pour conduits. • Installer le panneau arrière. ÉVACUATION PAR L'ARRIÈRE : • Couper une - GE PCKS443EBWW | User Manual - Page 23
ou quatre broches qui s'insère dans une prise correspondante pour sécheuse. INSTRUCTIONS DE MISE À LA TERRE • Cette appareil doit être mise à la mise à la terre. La fiche doit s'insérer dans une prise correspondante bien installée et mise à terre en conformité avec tous les codes locaux. MISE EN - GE PCKS443EBWW | User Manual - Page 24
FONCTIONNEMENT DE VOTRE SÉCHEUSE MISE EN GARDE - Avant de faire fonctionner cet éléctroménager, veuillez lire les MESURES DE SÉCURITÉ IMPORTANTES afin de réduire les risques d'incendie, de chocs électriques ou de blessures. Remarque : Il est possible que certaines caractéristiques ne soient pas - GE PCKS443EBWW | User Manual - Page 25
FONCTIONNEMENT Conseils pour le séchage des vêtements avec apprêt permanent et des tricots de polyester •NE SURCHARGEZ PAS LA SÉCHEUSELes vêtements que vous faites sécher ou défroisser doivent culbuter librement. •RETIREZ RAPIDEMENT LES VÊTEMENTSPour empêcher la formation de faux plis, retirez - GE PCKS443EBWW | User Manual - Page 26
PROGRAMMES SUGGÉRÉS SELON LES TISSUS Programme suggéré Auto Cottons Cotons Auto Perm. Press Auto Perm Press With Extra Dry/Sec Timed Dry Minute Quick Dry Séchage Rapide Pour une brassée de vêtements/tissus comme : • Cotons et toiles • Tissus sans repassage avec coton • Vêtements à bourre de duvet, - GE PCKS443EBWW | User Manual - Page 27
de minutes pendant lesquelles la sécheuse fonctionnera. Elle s'arrêtera à la fin de cette période. Meilleure performance des cycles automatiques Comme guide : Lors du prochain séchage d'une charge similaire, si vous désirez des articles plus secs, placez le pointeur •( ) vers la position "Extra - GE PCKS443EBWW | User Manual - Page 28
Nettoyer le filtre avant chaque usage de la sécheuse. Tirer la grille ver l'extérieur, tel qu'illustré. Nettoyer le filtre à charpie. Placer vos doigts humectés à un bout du filtre et nettoyer dans un mouvement latéral jusqu'à atteindre l'autre bout. TIRER NETTOYER LE FILTRE À CHARPIE APRÈS CHAQUE - GE PCKS443EBWW | User Manual - Page 29
Maximisez l'efficacité de votre sécheuse en gardant conduit d'évacuation propre MAXIMISEZ L'EFFICACITÉ DE VOTRE SÉCHEUSE EN GARDANT LE CONDUIT D'ÉVACUATION PROPRE 1. Débranchez le cordon d'alimentation de la prise de courant ou coupez l'alimentation électrique de la sécheuse en déclenchant le - GE PCKS443EBWW | User Manual - Page 30
DES QUESTIONS? CONSULTEZ CE GUIDE DE DÉPANNAGE PROBLÈME LA SÉCHEUSE NE FONCTIONNE PAS LES VÊTEMENTS , assurez-vous qu'il n'est pas plié et qu'il est correctement installé, conformément aux Directives d'installation. • Fusibles grillés ou disjoncteurs déclenchés. Vérifiez les fusibles ou les - GE PCKS443EBWW | User Manual - Page 31
NOTES 15 - GE PCKS443EBWW | User Manual - Page 32
fins domestiques au Canada par une seule famille, installé adéquatement selon les directives fournies par Camco et raccordé à un service public d'électricité vous expliquer le fonctionnement de l'appareil. Veuillez lire votre Guide d'utilisation et d'entretien. Pour toute question concernant le
-
 1
1 -
 2
2 -
 3
3 -
 4
4 -
 5
5 -
 6
6 -
 7
7 -
8
-
9
-
10
-
11
-
12
-
13
-
14
-
15
-
16
-
17
-
18
-
19
-
20
-
21
-
22
-
23
-
24
-
25
-
26
-
27
-
28
-
29
-
30
-
31
-
32
 |
 |
With Installation Instructions
500A
307P005
Use and Care Guide
Dryer
Safety Instructions
...................
3, 4
Installation Instructions
Exhaust
.........................................................
5, 6
Electric Dryer
...................................................
7
Operating Instructions, Tips
Automatic Drying
.................................
10, 11
Drying Selection Guide
..............................
10
Knits Drying Tips
..............................
8, 10, 14
Lint Filter
........................................................
12
Loading
.............................................................
9
Operating the Dryer
..................................
8, 9
Permanent Press
Drying Tips
.........................................
10, 14
Sorting Clothes
........................................
9, 10
Special Instructions
.............................
10, 11
Timed Drying
................................................
11
Care and Cleaning
Dryer Exhaust
...............................................
13
Exterior
...........................................................
12
Lint Filter
........................................................
12
Problem Solver
.............................
14
Consumer Services
Model and Serial Numbers
..........................
2
Repair Service
.................................................
2
Warranty
........................................................
16
www.geappliances.ca
For service call:
1-800-361-3400
We care about our environment
RECYCLED PAPER
RECYCLABLE