GE PDWT580VSS Use and Care Manual - Page 19
Warning, Advertencia
 |
View all GE PDWT580VSS manuals
Add to My Manuals
Save this manual to your list of manuals |
Page 19 highlights
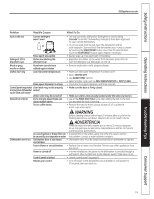
Safety Instructions Operating Instructions GEAppliances.com Problem Possible Causes What To Do Suds in the tub Correct detergent wasn't used Detergent left in dispenser cups Black or gray marks on dishes Dishes don't dry Rinse agent was spilled Dishes are blocking the detergent cup Aluminum utensils have rubbed against dishes Low inlet water temperature Rinse agent dispenser is empty Control panel responded Door latch may not be properly to inputs but dishwasher seated never filled with water Water valve may be turned off Stained tub interior Some tomato-based foods can cause reddish stains Tea or coffee stains • Use only automatic dishwasher detergents to avoid sudsing. Cascade® Automatic Dishwashing Detergents have been approved for use in all GE dishwashers. • To remove suds from the tub, open the dishwasher and let suds dissipate. Close and latch the dishwasher door. Pump out water by touching the START/RESET button once; then 30 seconds later, touch the START/RESET button again. Repeat if necessary. • Always wipe up rinse agent spills immediately. • Reposition the dishes, so the water from the lower spray arm can flush the detergent cup. See pages 15 and 16. • Remove marks with a mild, abrasive cleaner. • Make sure inlet water temperature is at least 120°F. • Select HEATED DRY. • Use ADDED HEAT options. • Select a higher cycle, such as SANI WASH/SANITIZE or DEEP CLEAN. • Check the rinse agent dispenser and fill as required. • Make sure the door is firmly closed. • Make sure water valve (usually located under the sink) is turned on. • Use of the RINSE AND HOLD cycle after adding the dish to the load can decrease the level of staining. • Remove the stain by hand, using a solution of 1/2 cup bleach and 3 cups warm water. Dishwasher won't run WARNING Before cleaning interior, wait at least 20 minutes after a cycle for the heating elements to cool down. Failure to do so can result in burns. ADVERTENCIA Antes de limpiar el interior, espere por lo menos 20 minutos después de un ciclo para que los elementos calentadores se enfríen. No hacerlo puede provocar quemaduras. An overall yellow or brown film can • A special filter in the water supply line is the only way to correct be caused by iron deposits in water this problem. Contact a water softener company. Dishwasher door is not closed • Dishwasher door must be closed and latched for dishwasher to operate. and latched Fuse is blown or circuit breaker • Replace fuse or reset circuit breaker. Remove any other appliances from the circuit. Power is turned off • In some installations, the power to the dishwasher is provided through a wall switch, often located next to the disposer switch. Make sure it is on. Control panel is locked • Unlock control panel. See page 8. Reboot your control • Turn off power to the dishwasher (circuit breaker or wall switch) for 30 seconds; then turn back on. Troubleshooting Tips Consumer Support 19
-
 1
1 -
2
-
3
-
4
-
5
-
6
-
7
-
8
-
9
-
10
-
11
-
12
-
13
-
 14
14 -
 15
15 -
 16
16 -
 17
17 -
 18
18 -
 19
19 -
 20
20 -
 21
21 -
 22
22 -
 23
23 -
 24
24 -
25
-
26
-
27
-
28
-
29
-
30
-
31
-
32
-
33
-
34
-
35
-
36
-
37
-
38
-
39
-
40
-
41
-
42
-
43
-
44
-
45
-
46
-
47
-
48
 |
 |
