GE PFE28KMKES Use and Care Manual - Page 13
About the K-Cup Brewing System. - keurig
 |
View all GE PFE28KMKES manuals
Add to My Manuals
Save this manual to your list of manuals |
Page 13 highlights
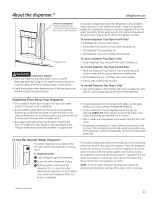
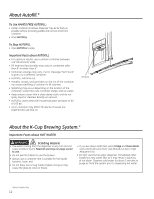
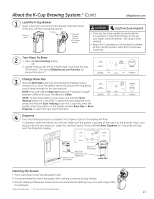
About the K-Cup Brewing System.* (Cont) GEAppliances.com 1 Load the K-Cup Brewer Insert a Keurig K-Cup pod into the brewer and press down firmly (you will hear a popping sound). Push to open K-Cup Close the brewer. Lid will click when secure. CAUTION Cut/Puncture Hazard. • There are two sharp needles located inside the K-Cup brewer. To avoid risk of injury, do not put your fingers inside the brewer. Use caution when cleaning. • Keep the K-Cup brewer out of the reach of children, as they may be injured in using the K-Cup brewer incorrectly. Two Ways To Brew 2 1. Press the Start Heating button. OR 2. Initiate heating with the GE Kitchen App. Download the App "GE Kitchen". Visit www.GEAppliances.com/connect for more information.** Change Brew Size 3 Press the Brew Size button any time during the heating cycle to choose 6, 8, or 10 oz. The default size is 8 oz. Ensure the mug being used is large enough for the size selected. NOTE: Press and hold the Brew Size button for 3 seconds to toggle between Coffee and Cocoa. The default is Coffee. NOTE: To abort the heating cycle, press and hold the Start Heating button for 3 seconds. To abort the brew dispense cycle, press and hold the Start Heating button for 3 seconds, press the paddle, press any button on the display besides Brew Size or Brew Dispense, or open the right fresh food door. 4 Dispense Once the heating process is complete, the Dispense light on the display will flash. To dispense, slide the brewer into the rails. Make sure the brewer is pushed all the way into the bracket. Place your mug on the drip tray mug icon, under the red brew spout. Press and hold Brew Dispense for 3 seconds until you hear the dispenser engage. Rails for the brewer Red brew spout for mug alignment Mug icon for placement Cleaning the brewer „ The K-Cup brewer is top rack dishwasher safe. „ It is recommended to rinse it thoroughly after washing to remove all soap residue. „ Periodic cleaning of dispenser recess area is recommended as staining may occur with usage of the K-Cup brewer. *Select Models Only ** For US and US Territories Only. 13
-
 1
1 -
2
-
3
-
4
-
5
-
6
-
7
-
 8
8 -
 9
9 -
 10
10 -
 11
11 -
 12
12 -
 13
13 -
 14
14 -
 15
15 -
 16
16 -
 17
17 -
 18
18 -
19
-
20
-
21
-
22
-
23
-
24
-
25
-
26
-
27
-
28
-
29
-
30
-
31
-
32
-
33
-
34
-
35
-
36
-
37
-
38
-
39
-
40
-
41
-
42
-
43
-
44
-
45
-
46
-
47
-
48
-
49
-
50
-
51
-
52
-
53
-
54
-
55
-
56
-
57
-
58
-
59
-
60
-
61
-
62
-
63
-
64
-
65
-
66
-
67
-
68
-
69
-
70
-
71
-
72
-
73
-
74
-
75
-
76
-
77
-
78
-
79
-
80
-
81
-
82
-
83
-
84
-
85
-
86
-
87
-
88
-
89
-
90
-
91
-
92
-
93
-
94
-
95
-
96
-
97
-
98
-
99
-
100
-
101
-
102
-
103
-
104
-
105
-
106
-
107
-
108
-
109
-
110
-
111
-
112
-
113
-
114
-
115
-
116
-
117
-
118
-
119
-
120
-
121
-
122
-
123
-
124
-
125
-
126
-
127
-
128
-
129
-
130
-
131
-
132
-
133
-
134
-
135
-
136
-
137
-
138
-
139
-
140
-
141
-
142
-
143
-
144
-
145
-
146
-
147
-
148
-
149
-
150
-
151
-
152
 |
 |
