GE PFE28KMKES Use and Care Manual - Page 17
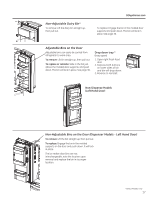
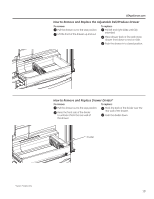
Non-Adjustable Bins on the Door, Dispenser Models - Left Hand Door, Adjustable Bins on the Door, Non
 |
View all GE PFE28KMKES manuals
Add to My Manuals
Save this manual to your list of manuals |
Page 17 highlights
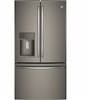
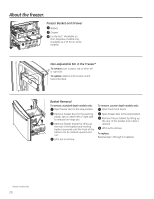
Non-Adjustable Dairy Bin* To remove: Lift the dairy bin straight up, then pull out. GEAppliances.com To replace: Engage the bin in the molded door supports and push down. The bin will lock in place. See page 36. Adjustable Bins on the Door Adjustable bins can easily be carried from refrigerator to work area. To remove: Lift bin straight up, then pull out. To replace or relocate: Slide in the bin just above the molded door supports, and push down. The bin will lock in place. See page 36. Drop down tray * (tray open) 1. Open right fresh food door 2. Depress both buttons on lower sides of bin and bin will drop down. 3. Reverse to reinstall. Non-Dispense Models (Left Hand Door) Non-Adjustable Bins on the Door (Dispenser Models - Left Hand Door) To remove: Lift the bin straight up, then pull out. To replace: Engage the bin in the molded supports on the door and push down. It will lock in place. The ice maker door bins are not interchangeable, note the location upon removal and replace the bin in its proper location. *Select Models Only 17
-
 1
1 -
2
-
3
-
4
-
5
-
6
-
7
-
8
-
9
-
10
-
11
-
 12
12 -
 13
13 -
 14
14 -
 15
15 -
 16
16 -
 17
17 -
 18
18 -
 19
19 -
 20
20 -
 21
21 -
 22
22 -
23
-
24
-
25
-
26
-
27
-
28
-
29
-
30
-
31
-
32
-
33
-
34
-
35
-
36
-
37
-
38
-
39
-
40
-
41
-
42
-
43
-
44
-
45
-
46
-
47
-
48
-
49
-
50
-
51
-
52
-
53
-
54
-
55
-
56
-
57
-
58
-
59
-
60
-
61
-
62
-
63
-
64
-
65
-
66
-
67
-
68
-
69
-
70
-
71
-
72
-
73
-
74
-
75
-
76
-
77
-
78
-
79
-
80
-
81
-
82
-
83
-
84
-
85
-
86
-
87
-
88
-
89
-
90
-
91
-
92
-
93
-
94
-
95
-
96
-
97
-
98
-
99
-
100
-
101
-
102
-
103
-
104
-
105
-
106
-
107
-
108
-
109
-
110
-
111
-
112
-
113
-
114
-
115
-
116
-
117
-
118
-
119
-
120
-
121
-
122
-
123
-
124
-
125
-
126
-
127
-
128
-
129
-
130
-
131
-
132
-
133
-
134
-
135
-
136
-
137
-
138
-
139
-
140
-
141
-
142
-
143
-
144
-
145
-
146
-
147
-
148
-
149
-
150
-
151
-
152
 |
 |
