GE PGB916SEMSS Installation Instructions - Page 39
Door Removal, Oven Bottom, DO NOT USE for Cooktop or Stainless Steel - canada
 |
UPC - 084691166320
View all GE PGB916SEMSS manuals
Add to My Manuals
Save this manual to your list of manuals |
Page 39 highlights
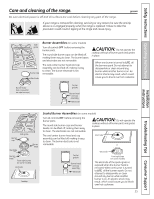
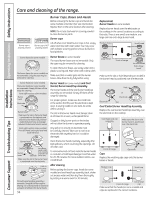
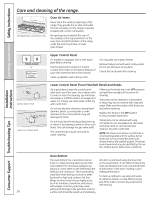
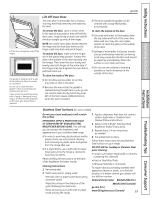
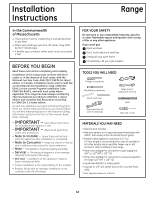
Safety Instructions Operating Instructions ge.com Lift the door straight up and off the hinges. The gasket is designed with a gap at the bottom to allow for proper air circulation. Do not rub or clean the door gasket-it has an extremely low resistance to abrasion. If you notice the gasket becoming worn, frayed or damaged in any way or if it has become displaced on the door, you should have it replaced. Lift-Off Oven Door The oven door is removable, but it is heavy. You may need help removing and replacing the door. To remove the door, open it a few inches to the special stop position that will hold the door open. Grasp firmly on each side and lift the door straight up and off the hinges. NOTE: Be careful not to place hands between the hinge and the oven door frame as the hinge could snap back and pinch fingers. To replace the door, make sure the hinges are in the special stop position. Position the slots in the bottom of the door squarely over the hinges. Then lower the door slowly and evenly over both hinges at the same time. If the hinges snap back against the oven frame, pull them back out. To clean the inside of the door: I Do not allow excess water to run into any holes or slots in the door. I Because the area inside the gasket is cleaned during the self clean cycle, you do not need to clean this by hand. Any soap left on the liner causes additional stains when the oven is heated. I The area outside the gasket can be cleaned with a soap-filled plastic scouring pad. To clean the outside of the door: I Use soap and water to thoroughly clean the top, sides and front of the oven door. Rinse well. You may also use a glass cleaner to clean the glass on the outside of the door. I Spillage of marinades, fruit juices, tomato sauces and basting materials containing acids may cause discoloration and should be wiped up immediately. When the surface is cool, clean and rinse. I Do not use oven cleaners, cleansing powders or harsh abrasives on the outside of the door. Installation Instructions Troubleshooting Tips Consumer Support Stainless Steel Surfaces (on some models) Do not use a steel wool pad; it will scratch the surface. IMPORTANT: APPLY A PROTECTIVE COAT OF CERAMA BRYTE® STAINLESS STEEL BRIGHTENER BEFORE USING. This will help you to maintain the brightness and appearance of your stainless steel range. I In order to avoid any discolorations and/or grease stains, we recommend cleaning and removing any spills, spots and grease from the range after use. I It is important to use a soft cloth or paper towel every time the range is cleaned to avoid any scratches. Read carefully the instructions on the back of the Brightener for better results. Cleaning Instructions: 1. Remove grates. 2. Wash using warm, soapy water: Wet soft cloth or paper towel (avoid using excessive water). Wipe the surface in the direction of the grain (following the steel lines). Rinse and wring out a soft cloth or paper towel and dry the range. 3. Apply a degreaser that does not contain sodium hydroxide or Stainless Steel Cleaner (follow instructions). 4. Apply Cerama Bryte® Stainless Steel Brightener (follow instructions). 5. Repeat steps 2-4 as many times as needed. 6. Put grates back in place. Follow these instructions for any Stainless Steel surface on your range. DO NOT USE for Cooktop or Stainless Steel parts cleaning: • Caustic Lye (Sodium Hydroxide) or cleaners containing this chemical • Hard or Steel Wool Pads • Abrasive Materials or Chemicals To inquire about purchasing stainless steel appliance cleaner or polish, or to find the location of a dealer nearest you, please call our toll-free number: National Parts Center 800.626.2002 (U.S.) 888.261.3055 (Canada) ge.com (U.S.) www.GEAppliances.ca (Canada) 39
-
 1
1 -
2
-
3
-
4
-
5
-
6
-
7
-
8
-
9
-
10
-
11
-
12
-
13
-
14
-
15
-
16
-
17
-
18
-
19
-
20
-
21
-
22
-
23
-
24
-
25
-
26
-
27
-
28
-
29
-
30
-
31
-
32
-
33
-
 34
34 -
 35
35 -
 36
36 -
 37
37 -
 38
38 -
 39
39 -
 40
40 -
 41
41 -
 42
42 -
 43
43 -
 44
44 -
45
-
46
-
47
-
48
-
49
-
50
-
51
-
52
-
53
-
54
-
55
-
56
-
57
-
58
-
59
-
60
-
61
-
62
-
63
-
64
 |
 |
