GE PS968SPSS Use and Care Manual - Page 28
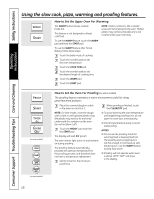
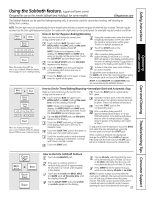
Using the slow cook, pizza, warming and proofing features., How to Set the Upper Oven For Warming
 |
UPC - 084691197546
View all GE PS968SPSS manuals
Add to My Manuals
Save this manual to your list of manuals |
Page 28 highlights
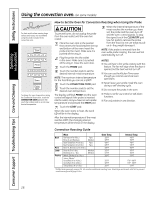
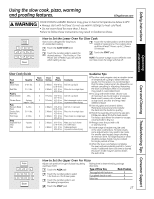
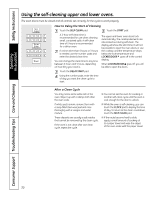
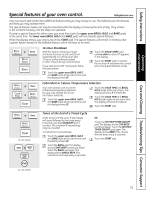
Safety Instructions Operating Instructions Consumer Support Troubleshooting Tips Care and Cleaning Using the slow cook, pizza, warming and proofing features. How to Set the Upper Oven For Warming The WARM feature keeps cooked foods hot. This feature is not designed to reheat cold food. NOTE: Plastic containers, lids or plastic wrap will melt if placed in the oven. Melted plastic may not be removable and is not covered under your warranty. To use the WARM feature, touch the WARM pad and then the START pad. To use the WARM feature after Timed Baking, follow these steps: Touch the bake mode of cooking. Touch the number pads to set the oven temperature. Touch the COOK TIME pad. Touch the number pads to set the desired length of cooking time. Touch the WARM pad. Touch the START pad. (on some models) How to Set the Oven For Proofing (on some models) The proofing feature maintains a warm environment useful for rising yeast-leavened products. Place the covered dough in a dish in the oven on rack B or C. When proofing is finished, touch the CLEAR/OFF pad. NOTE: For best results, cover the dough with a cloth or with greased plastic wrap (the plastic may need to be anchored underneath the container so the oven fan will not blow it off). Touch the PROOF pad and then the START pad. The display will read PrF (proof). The oven interior light turns on and remains on during proofing. The proofing feature automatically provides the optimum temperature for the proofing process, and therefore does not have a temperature adjustment. Set the Timer for the minimum proof time. s To avoid lowering the oven temperature and lengthening proofing time, do not open the oven door unnecessarily. s Check bread products early to avoid overproofing. NOTES: s Do not use the proofing mode for warming food or keeping food hot. The proofing oven temperature is not hot enough to hold foods at safe temperatures. Use the WARM feature to keep food warm. s Proofing will not operate when oven is above 125°F. "HOT" will show in the display. (on some models) 28
-
 1
1 -
2
-
3
-
4
-
5
-
6
-
7
-
8
-
9
-
10
-
11
-
12
-
13
-
14
-
15
-
16
-
17
-
18
-
19
-
20
-
21
-
22
-
 23
23 -
 24
24 -
 25
25 -
 26
26 -
 27
27 -
 28
28 -
 29
29 -
 30
30 -
 31
31 -
 32
32 -
 33
33 -
34
-
35
-
36
-
37
-
38
-
39
-
40
-
41
-
42
-
43
-
44
-
45
-
46
-
47
-
48
-
49
-
50
-
51
-
52
-
53
-
54
-
55
-
56
-
57
-
58
-
59
-
60
-
61
-
62
-
63
-
64
-
65
-
66
-
67
-
68
-
69
-
70
-
71
-
72
-
73
-
74
-
75
-
76
-
77
-
78
-
79
-
80
-
81
-
82
-
83
-
84
-
85
-
86
-
87
-
88
-
89
-
90
-
91
-
92
-
93
-
94
-
95
-
96
-
97
-
98
-
99
-
100
-
101
-
102
-
103
-
104
 |
 |
