GE PSC23PSWSS Owners Manual - Page 7
About CustomCool, Consumer Support, Troubleshooting Tips, Safety Instructions
 |
UPC - 084691150329
View all GE PSC23PSWSS manuals
Add to My Manuals
Save this manual to your list of manuals |
Page 7 highlights
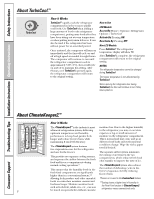
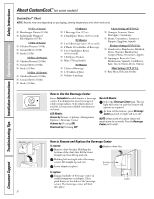
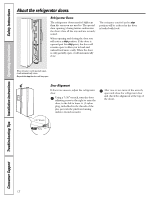
Safety Instructions Operating Instructions Installation Instructions Troubleshooting Tips Consumer Support About CustomCool.™(on some models) ge.com On LCD models ExpressThaw™ ExpressChill™ How it Works The CustomCool™ feature is used to quickly chill items, thaw items or hold the pan at a specific temperature. This feature is a system of dampers, a fan, a temperature thermistor and a heater. The pan is tightly sealed to prevent temperature fluctuations in the rest of the refrigerator. The controls for this pan are located at the top of the refrigerator with the temperature controls, or on the dispenser with the temperature controls. How to Use Empty the pan. Place the Chill/Thaw tray in the pan. Place the items on the tray and close the pan completely. LCD Models: Access by: Home > Options > Refrigerator Options > CustomCool Pan Non-LCD Models: Select the ExpressThaw™, ExpressChill™ or SelectTemp™ pad. The display and SET light will come on. Tap the pad until the light appears next to the desired setting. Use the following chart to determine the best setting to use. I On some models, ExpressChill has only one 45 minute setting. I To stop a feature before it is finished: For LCD Models: Go into that feature's menu and press the OFF button. For Non-LCD Models: Tap that feature's pad until no options are selected and the display is off. I During ExpressThaw and ExpressChill, the display on the controls will count down the time in the cycle (on some models). I After the ExpressThaw cycle is complete, the pan will reset to the MEAT setting (32°F [0°C]) to help preserve thawed items until they are used. I The displayed actual temperature of the CustomCool pan may vary slightly from the SET temperature based on usage and operating environment. NOTE: For food safety reasons, it is recommended that foods be wrapped in plastic wrap when using ExpressThaw. This will help contain meat juices and improve thawing performance. How to Remove and Replace the Drawer To remove: Pull the drawer out to the stop position. Rotate all four swing locks to the unlock position. Lift the front of the drawer up and out. Lock all four swing locks by rotating them to the lock position. To replace: Make sure all four swing locks are in the unlock position. Place the sides of the drawer into the drawer supports, making sure the swing locks fit on the drawer slots. 7
-
 1
1 -
 2
2 -
 3
3 -
 4
4 -
 5
5 -
 6
6 -
 7
7 -
 8
8 -
 9
9 -
 10
10 -
 11
11 -
 12
12 -
13
-
14
-
15
-
16
-
17
-
18
-
19
-
20
-
21
-
22
-
23
-
24
-
25
-
26
-
27
-
28
-
29
-
30
-
31
-
32
-
33
-
34
-
35
-
36
-
37
-
38
-
39
-
40
-
41
-
42
-
43
-
44
-
45
-
46
-
47
-
48
-
49
-
50
-
51
-
52
-
53
-
54
-
55
-
56
-
57
-
58
-
59
-
60
-
61
-
62
-
63
-
64
-
65
-
66
-
67
-
68
-
69
-
70
-
71
-
72
-
73
-
74
-
75
-
76
-
77
-
78
-
79
-
80
-
81
-
82
-
83
-
84
-
85
-
86
-
87
-
88
-
89
-
90
-
91
-
92
-
93
-
94
-
95
-
96
-
97
-
98
-
99
-
100
-
101
-
102
-
103
-
104
-
105
-
106
-
107
-
108
-
109
-
110
-
111
-
112
-
113
-
114
-
115
-
116
-
117
-
118
-
119
-
120
-
121
-
122
-
123
-
124
-
125
-
126
-
127
-
128
-
129
-
130
-
131
-
132
 |
 |
